Showing posts with label Costuming: The Gospel According to Scrooge '05. Show all posts

Wednesday, December 20, 2006

Faux Tails


I've been meaning to get some photos of the 'Tailed Coats' we used for Scrooge for ages; since I happened to have a camera with me while I was working w/costumes yesterday, I snapped a couple of quick shots. Most of the coats are dark blue or black; this one happens to be light enough that you can see what was done.

Disclaimer: this actually was not my idea; the guys' costumes that came in the donation from the church in Florida (including this one) were all done this way.

Anyway, what those clever Floridian seamstresses did was to
1)cut away the front of the coats from the waist down...from the front edge to the sideseams
2)Attach the cutaway portions to the bottom of the back of the jacket so that the finished edges met in the middle, and the cut edges were in the new seam and along the sides (Um, I just noticed that on this coat, the finished edges are the outside and bottom of the tails; they adjusted the cut edges to fit, turned them under, then met those edges in the middle)
3)finished the raw edges (bottom of the front, along the sides) with bias tape, or gimp applied over a serged or zig-zaggged edge.

And...lookie...tails!

This jacket is especially interesting because of the pockets...I believe it was, in its former life, a 70's 'leisure suit' type coat; it had flapped patch pockets. The flaps were retained on the front, and the patch pockets are, um, adorning the tails. Amusing up close...but barely noticeable on stage.

I've made costume tail coats from scratch and this way; I must say, this is a great quick-and-dirty answer to the guys costume dilemma.

I just wish I'd posted it early enough to help out ladies who are costuming Dickens shows this year....

Friday, May 26, 2006

Scrooge Costumes Revisited

Note to folks who landed here searching for info on sewing for a Dickens era production: if you click on 'Dickens Costuming Tips' on the top of the left sidebar, it will bring up a series of posts with tips/hints/links for costuming a Dickens production

Oh, they're still in the back of my mind; for one thing, the attic storage area is complete gridlock. But now that a major remodling project at church is about finished I can hopefully get down and work on sorting/storing/organizing this summer. But that's not really what I wanted to share.

I was hunting around on Google yesterday for other productions of Scrooge and it turned up a page on our church's website that I didn't know was there. It's a page with different little promo videos that get run on the screens before the service and...there's one for the Scrooge DVD! I tried to get a link straight to the Scrooge clip, but it apparently is linked up through the index page, so the best I could do was a link there. There is sound on it, but I'm not sure what it is since our sound card and our CPU are not speaking to each other and I can't hear anything...

Anyway, if you want to see what the costumes looked like moving about on stage, click HERE, then click on 'The Gospel According To Scrooge' icon in the lower left corner (it's a still from the graveyard scene -- you'll have to scroll down slightly).


[Edit 11-29-07: The church website has been completely overhauled and that clip isn't on it any more. If it gets reposted, I'll fix the link!]

They'll be doing auditions for this year's production in about 3 months...I need to get crackin' on the costume organization.

Tuesday, December 20, 2005

Cleanup Time

That's all that's left...but boy, is there a bunch of cleanup! Not the least at home, where I don't think the sound of a vacuum cleaner has been heard since Thanksgiving. But I got the reviews all posted yesterday, before I forgot what I did, and if you click on 'My Reviewed Patterns' on the sidebar you'll see them...the five most recent reviews are all costumes.

And the Christmas packages are all going out in the mail this morning; yesterday was a shopping and wrapping marathon. Still not done, but at least what is left will not have to be mailed anywhere.

But the first order of business on today's agenda is grocery shopping...somehow that didn't get done very well in the last few weeks either and the larder is pretty bare.

And I'm already trying to decide which of my delayed personal sewing projects I'm going to tackle first. It would be so nice to get a few more yards on the 'yards out' total for the year. I'm so close to fabric parity...(current totals: 121.5 yards in/103 yards out...not including any costume sewing)

Monday, December 19, 2005

Whew

Very good run of the production! Estimates are that somewhere in the neighborhood of 4,500 folks saw the show (well, that's the audience count; I'm certain there were a large number of repeats from our home folks) and it was very well received. I don't have to worry about sorting the costumes for cleaning until after Christmas, for which I am VERY grateful.
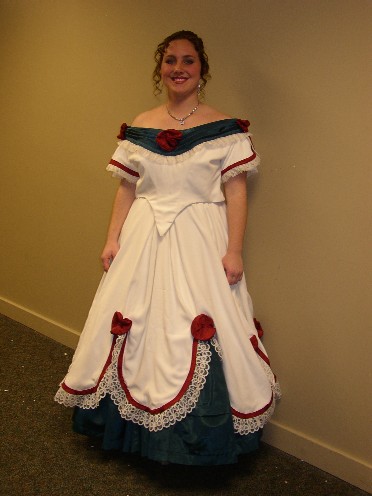
Here's the link to the bulk of the output of Ye Olde Dresse Shoppe, but I have to say that I didn't make any single garment all by myself from start to finish...at least one of several different sewing ladies did at least a little on each piece. Miss A even made about 3/4 of my bertha for me while I was sewing the hooks on Belle 10's bodice. It truly was a team effort.

Scrooge 05 Sewing

Sunday, December 18, 2005

Closed for the Season


We officially closed Ye Olde Dresse Shoppe yesterday; everything that's going to get done is done. I finished my costume at about 10:30 yesterday morning, so I got to wear it at both performances yesterday and the closing show tonight. I felt much more appropriately Victorian with the whole thing on! But, I'm not sure how to review it; the skirt is from last year's dress, with the front panel replaced. I used the front panel to make a new, separate bodice, and borrowed the bertha pattern from the Belle dress to make a bertha from the contrast fabric on the skirt. The new one fits and feels SO MUCH BETTER!

Saturday, December 17, 2005

The Ink Wasn't Dry...

We finished Belle 10's dress at about 4:30 yesterday...a whole 2 1/2 hours before curtain. Miss A and I did a tag-team sewing frenzy; I'd put together one component while she did another; I'd put the two components together while she started the next, etc. Frantic but it worked. Belle 10 came in for her final fitting at about 1:30; I fit it on her w/o sleeves first, to make sure we didn't have tight sleeve issues like we did w/Belle 16, then put the sleeves on it and put it on her again. When she left at about 3:00 I started sewing on the hooks and eyes...and I dug a small hole in my finger w/the eye of the needle (have I mentioned anywhere that we are using some unnamed mystery lining fabric that seems to actively repel being punctured? We've had lots of fun sewing this stuff...but it'll be good and durable, you bet!). But she was ready to go on on time and the dress looked fabulous on her. And, while I was finishing up the hooks and eyes, Miss A made a goodly portion of the bertha for MY dress, which I still haven't worn on stage. Maybe today.

Wouldn't you know, while we remembered to take the digi cam, the batteries were dead and I still haven't got good photos of the finished product. We have two performances today...Belle 16 is in the matinee and Belle 10 is doing the evening show, so I WILL get photos of both girls. I did update my reviews of the Angel 2 robe and the Victorian Gentleman's jacket to include photos of the garments on the actual people, taken opening night; you can click on the 'My Reviews' link to find 'em.

BTW, today also happens to be older DD's 20th birthday. I don't think I'm any less tired today than I was 20 years ago.

Friday, December 16, 2005

Still Sewing....

Everyone is shocked to find that we are *still* not finished w/costumes...Belle 10 goes on tonight and her bodice is only partially assembled. We are putting what we learned on Belle 16 to work, though, and it's going together a bit faster. We're hoping to have it done to the back hooks and eyes by noon so we can try it on her to see where to place those items.

Yesterday, after a bit of discussion (and after I'd studied that photo I posted yesterday), we decided part of the reason Belle 16's dress fit so poorly was that the sleeves were too tight and she couldn't quite pull it up to where it should be. So we took the sleeves off, serged about 1/4" off the armsceye all the way around, took the overlapping bit of the oversleeves off and pulled some of the gathering thread loose to enlarge the armhole for her, and we cut (ouch!) the undersleeve net/lace band and up into the undersleeve a bit to open the band and closed it with about an inch of 3/8" elastic. It fit much better; I was able to overlap the top of the bodice (but not the bottom) about an inch more at the top. A couple of saftey pins and a good tug on the ribbon drawstring at the top and it fit her much better. Of course, I forgot the camera yesterday so you'll just have to take my word for it. ;)

However, the instructions require that the skirt and the bodice be connected w/hooks and eyes...that doesn't work really well on an elastic waistband. We tried, but I think we're just going to have to keep her together at the waist with safety pins.

My bodice is done to the bertha and waistband hooks; don't know if I'll be wearing it tonight or not. It would be nice, wouldn't it?

Thursday, December 15, 2005

Opening Night


Poor Belle was held together with prayer and saftey pins; one muslin clearly was not enough to properly fit the bodice on this style. Unfortunately, one muslin was all we had time for. It didn't help that the young lady portraying her had a nasty digestive virus two days ago and probably lost five pounds in the process. I will say, however, that the camera shows the loose fit much worse than the naked eye, and I'm told that, from stage, it looked great. We still have to finish the bodice for the second Belle, who is playing the role tomorrow. I think we can do it ;).

As soon as I get a moment (next week?) , I'll review all the patterns I haven't reviewed yet and add updated photos to the ones I have.

I was surprised at the crowd we had last night; the church was full. Standing in the back of the sanctuary (in my Plan B costume, I might add), waiting on the cue to move into place for the opening, I looked at the crowd and thought 'This is it'...and nealy bawled. I think I was just really tired, but to my amazement I was blinking back tears. I didn't have a tissue anywhere on me, so I couldn't cry. "No, Lisa...you're happy! You're a shopping, singing Townsperson! No crying!" Fortunately I pulled it together but it was a near thing. :rolleyes:

But it was worth it! We received many compliments on the show afterwards, and, most importantly, there were 15 people who made decisions concerning their relationship to Christ, which is why we do this whole thing in the first place.

Wednesday, December 14, 2005

That is NOT an Oncoming Train!

It really is the end of the tunnel! Show opens tonight, although we expect the audience to be comprised mostly of folks from our own church; the people from the community at large will be here Fri-Sun...or at least that's how it worked last year. Everyone was costumed for dress rehearsal except Belle 10 and me...neither of our bodices are done yet. We wore our skirts and knit tops; very interesting combo. Miss A stayed in the sewing room and worked on the bertha for Belle 16...it's just about finished now, she did a lovely job, so unless the hooks and eyes that close her top are totatlly wrong (and they may be; I've got to put it on her this morning to check) she's just about done. Belle 10's bodice is cut out only, but she doesn't play the part until Friday so we've got a bit of breathing room there. I've just got hooks/eyes and the bertha to do for mine...and I've still got to find a 'suitable' (read 'strapless') foundation ;)

I forgot the camera again and didn't get any photos last night, but I will get some sometime during the run of the show. And I went to bed at about 10:30 last night; much better than 1:30 or 2 am!

Tuesday, December 13, 2005

ZZZZZzzzzzzzz......

We (Miss M and I...it was Miss A's birthday, so I told her not to come back to sew after her hubby took her to dinner. I won't even dock her paycheck... ;) ) worked until 12:30 AM this morning, and just as we were leaving church I thought of something important that I had to do when I got home. But, when I got home I couldn't remember at all what it was. I put some laundry in to wash, got myself a snack, read a bit (An Excellent Mystery, the 11th Brother Cadfael book) and still had no idea. About 2:15 I gave up and went to bed.

I still don't know what it was. Sigh.

I've got an awfully lot to do today. Final dress rehearsal is tonight. If I'm awake enough to hold a camera, I'll try to take some photos. It did occur to me that I could likely do a fair amount of hand sewing backstage; that's good, we've got a bazillion hooks and eyes to sew on things.

Monday, December 12, 2005

Your Basic Dickens Skirt

These are the directions I wrote last year for sewing volunteers who were helping us make skirts, slightly condensed and updated to include the drawstring,which we found to be pretty much a necessity. I thoughty I'd share them here, as this is pretty much what we did for all the skirts (except the Belle skirt...that was an exception) we made, regardless of the pattern for the bodice. I probably should add that from now on we will also be incorporating inseam pockets, just in case someone wearing the skirt should need a microphone transmitter at any time. Sorry I don't have any photos of the process...maybe later.

Directions for Sewing a Big Pouffy Skirt

This skirt works great on stage for early Victorian (i.e., Dickens- era) productions. It is a pull-on elastic waist skirt and quite simple; I’ve included directions for adding a drawstring to the elastic waist (increases size flexibility), but you can just put the waistband seam in the back and skip all the references to the drawstring if you prefer.

Fabric required: First, determine the skirt length:

Skirt Length = Waistline-to-floor measurement, plus 5/8” seam allowance at waist, plus desired hem allowance. (note: if a full slip is worn under the skirt, it will pull the length up a bit)

Waistband width = 2 x elastic width + 2 x 5/8” seam allowances (1 ¼”)+ ¼” casing ease. I recommend using elastic that can be sewn through, as you will sew through it twice to create the casing for the drawstring.

*Important Note* - If the lady who will wear your skirt has a hip measurement that exceeds the width of the fabric you will need to cut another strip the width of your waistband and piece them to the desired measurement, so you would have to add a second waistband width to the needed length of the fabric.

For 45” fabric, the fabric required will be 4 x the skirt length + the waistband width. For instance, my skirt length is: 41” (waistline-to-floor) + 2" hem  + 5/8” = 43 5/8”, which is just slightly less than 1 ¼ yds; I’m planning to use 1 ½” wide elastic (note: I suggest hefty elastic; this will be a heavy skirt) so my waistband width will be 1 ½ x 2 + 1 ¼” (5/8” seam allowances along the length)+ ¼” (turn-of-the-cloth allowance) = 4 ½” = 1/8 yd. So my skirt would require 4x 1 1/4yds + 1/8 yd = 5 1/8 yds…but I’d buy 5 ½ yards, in case it shrinks a bit in pre-washing, and also to allow for crooked cutting at the fabric store. (I’ve had to cut of a lot of fabric to square edges in the past!). For 60” fabric, the same formula applies, but you only have to multiply the waist-to-floor measurement by 3. (note: this will yield a skirt that is approximately 176” – 180” at the bottom.)

Cutting out the skirt:
Straighten the edges of the fabric before cutting, so that you have an on-grain line to cut on. The best way…albeit tedious…to do this is to pull a crosswise thread completely out of the fabric and carefully cut along the resulting void in the fabric. Of course, if you have a plaid, you can just cut along one of the horizontal bars.
From one straight edge, measure off the distance required for the width of the waist band (in my example above, that would be 4 ½”) and cut straight across the grain, either by pulling another thread or using a rotary cutter and ruler.

Now, for 45” fabric, measure and cut four Skirt Lengths as determined above
For 60” fabric, you only need three Skirt Lengths

Cut the waistband length on the cross grain such that
Waistband Length = hip measurement + 2” (for hip ease)+ 1/1/4” (5/8” seam allowances). The Waistband width was determined by the elastic width.

*Important Note Repeated* - If the lady who will wear your skirt has a hip measurement that exceeds the width of the fabric you will need to cut another strip the width of your waistband and piece them to the desired measurement.  The finished waistband circumference should be no less than 1" larger than the hip measurement.

You’re done cutting.

Skirt Construction: (Note: these directions are for conventional machines; if you have a serger, you’re probably advanced enough to figure it out the serger techniques for yourself)

Seams: Simply lay the right sides of the fabric together and sew all the panels together along the long, selvedge edges. The seam allowance width here is not important…just make sure you use the same one for all the edges and you include all the selvedge (the coarser woven part of the edge of the fabric) in the seam allowance. ½” will probably be sufficient, but sometimes the printing doesn’t go all the way to the edge and you may have to use as much as a ¾” allowance so as not to have a white line along the seam. Press the seams open.
For the seam that closes the waistband, choose one edge to be the ‘wrong side’ of the waistband and make a mark 3/4” from this edge on the seam line. Now, fold the waistband in half lengthwise and make a mark at the exact middle of that edge. Make another mark 1/8” in from the middle mark, on the same half of the waistband as the first mark. The first mark and the third mark show where to leave the opening to insert the elastic. Put right sides together, and sew the waistband seam, leaving the area between the two marks unsewn (backstitch securely at the marks; this opening will get stressed when you put the elastic in). Press the seam open and, for less aggravation later, machine baste the seam allowances down (this will keep them out of the way when you’re putting the elastic through) Fold the waistband in half lengthwise, WRONG sides together, and baste it ½” from the raw edge.

Attaching the skirt to the waistband is probably the most patience-requiring step!
First, quarter mark the waistband…fold it in half, with the seam on one fold. This will be Center Front, so the drawstring is easily accesible to the wearer. The other fold is Center Back; put a pin there to mark it. Then, re-fold the band so that the Center Back mark is matched to the seam and put pins on each of the resulting folds. Now you have the waistband marked into four equal lengths.

If you’re using 45” fabric, you have four seams already marking the quarter divisions and you’ll be matching the seams to the marks you made on the waistband. If you’re using 60” fabric, though, you’ll have one seam on the center back and you’ll have to fold the fabric just like you did the waistband to get the other three marks. Note that the Center Front mark will be in the center of the panel opposite the seam chosen to be Center Back.

Using your favorite method for gathering large amounts of fabric, gather the skirt pieces to the waistband, matching the quarter marks. The side of the waistband WITHOUT the opening in the seam will be the right side, which you will match to the right side of the skirt. For the 4-panel skirt, match any seam to the seam on the waistband…for the three panel skirt, match the seam to the Center Front mark . (this will be much easier if you turn the skirt wrong side out and pin it so that the skirt is outside the waistband).

Now, DON’T FORGET to set your sewing machine tension and stitch length back to normal, and slowly stitch the skirt to the waistband on top of the 5/8” gathering stitch.. When you’re done, pull the skirt off of the machine and clip the threads and inspect the seam you just sewed for puckers or other sewing errors…if you find any (the most common will be that fabric that shouldn’t be in the seam got caught in it), carefully unpick those stitches, straighten the fabric and re-stitch it. Once everything is stitched down well, remove any basting that shows on the right side and, for security’s sake (this is going to be a heavy skirt) stitch the seam again, right on top of the first stitching. Then, to finish the edge of the seam, zig-zag stitch the raw edges together. Press the waistband up away from the skirt, press the seam toward the waistband.

Now, cut the elastic so it is about three inches smaller than your HONEST waist measurement (it needs to fit snugly to support the weight of the skirt) NOTE:  If you're using very firm elastic w/ less than 1:1 stretch ratio, cut it a little larger..up to no more than 1/2" larger than the actual waist measurement, so that it's just slightly smaller than the waist after closing the circle.

Using a large safety pin or bodkin, thread the elastic through the casing, being careful not to twist it. When it’s through (again, make sure it’s not twisted) overlap the ends ¾” – 1” and sew them together, using a crossed box for security (sew a box over the overlapping portion of the elastic, then sew from one corner to the opposite corner, along the edge to the adjacent corner, and cross back to the opposite corner again). Stretch the waistband to pull the elastic completely inside. To make the drawstring casing, lengthen the stitch length and topstitch about 3/8” from the top edge all the way around the waistband, stretching the elastic to fit as you go. Repeat this step at about 3/8” above the waistband seam. This just keeps the drawstring from slipping around to the top of the waistband, which is uncomfortable and unattractive. Using a pin or a bodkin, thread the drawstring (cord, twill tape or ribbon) through the waistband. Remove basting stitches at the opening.

Now all you have left is the hem! First, zig-zag along the whole lower edge of the skirt to keep it from raveling (a better finish would be to press it under ½” and stitch it, but I’ll admit that would be tedious. Go for it if you feel patient) Put the skirt on over the pouffy slip with the shoes on you plan to wear, and have a sewing buddy (or just someone who’s around the house) pin mark the skirt ½” above the floor. Remove the skirt and measure the edge to the pin…that’s the hem you need. Press up the hem all the way around; you can fuse it down w/fusible webbing, or straight stitch it on the machine…that’s up to you. Fusible DOES come undone after a while...

Now, breath a sigh of relief…your skirt’s done!

Sunday, December 11, 2005

Which Dwarf Am I?

Miss M and I worked until 12:45 AM Friday/Saturday to get what costumes were ready (and it was most of them...Belle is the only really noteable tardy) and pulled to the dressing areas at the other end of the building. She is a crossing guard with the city safety division and had to work the Rocket City Marathon yesterday; I was at Wal-Mart at 7 AM buying Febreze to spray the costumes down after rehearsal. But I was so busy tending costume issues that I didn't get dressed at all and went through my scenes in my street clothes. There are a few notes to deal with...a couple of skirts (including Belle's) need to be shortened about 2 inches, and Angel Two needs to have the side seams of her cloak opened from the shoulder to the waist so she can put her arms outside of it (I shoulda thought of it). And here's a note for future reference: every garment we make from now on will have a pocket in it that we can stick a microphone tranmitter in. Live and learn.

But I spent most of the day wondering if I were Sleepy, Grumpy or Dopey...or all three...

Next dress rehearsal Tuesday...Show opens Wendesday. I'll post some photos when I get a chance to take them.

Friday, December 09, 2005

Dress Rehearsal Tomorrow

Ack!
Gotta make at least one Belle bodice today; I got the girls into the muslins yesterday and saw what adjustments needed to be made; brought the patterns home after rehearsal last night and made the changes, so they're ready to cut when I get in this morning. Both of the girls needed extra length in the side and back; I think that's a pattern draft issue. But Miss A will be in and I do believe we'll tag team the construction somewhat. Belle 16 will wear the skirt/bodice tomorrow; I do have a backup dress for Belle 10, who doesn't play the part until Friday night's show. So we have a week on hers. Oh...and the Ruffle that Doesn't End has to be shortened 2". I'll have one of the extra helper ladies (I'm expecting at least one today) pin it up for me...then I'll cheat and run it through the Kenmore with the blind hem stitch.

To quote Ann Steeves, "This is costuming, not couture!"

You won't believe how many times I have told myself that this week. ;)

Thursday, December 08, 2005

WIP - Belle's skirt


Still needs the rest of the poufs -- basically oversized fabric yo-yos -- at the top of the swoops. Fitting today (I hope!). If the bodice muslins basically fit I think I might actually make it by Saturday...

Wednesday, December 07, 2005

Making Haste Slowly

I'm determined to do it right so it doesn't come apart...but it's taking a lot of time. Dress rehearsal Saturday; I'm really going to have to push it to get both Belle bodices done. And that doesn't include the dustmen or the Angel of Christmas Yet to Come or the oddball trim/mend projects that are yet to be finished. But the skirt is done to the waistband and a wee bit of trim. It's gorgeous and it weighs a ton. Well, maybe not a ton...but I'm guessing it's a good 8 pounds!

At least both Miss M and Miss A have secured time off from work for the remainder of the week, so they are planning to come in and work. We'll get as much done as we can.

And I sat up till ??? this AM putting the Christmas letters in envelopes and putting the address labels on them. Christmas isn't waiting on me to get done, either.

Tuesday, December 06, 2005

Somebody Stop the Clock....

I commented to one of the set builders last night that, if this were last week, I'd consider myself to be in pretty good shape regarding the costumes. Unfortunately, it's not last week and I'm feeling rather behind. I got all the trim on the Belle skirt last night...omigosh, the fabric/lace combo is wonderfully Christmassy...but the skirt still isn't finished. I did manage to get the patterns for the bodices altered while I sat at home with ailing DD, so that was good, but her fever came back up last night so she will not be going to school today either. Somehow today I must get the skirt finished and bodice muslins cut and basted up so I can try them on the girls.

The show opens a week from tomorrow. I am taking deep breaths and praying a lot...

Monday, December 05, 2005

Lose One Turn

I had truly hoped to have the skirt portion of the Belle skirt finished and the muslins of the bodices ready for the girls to try on, but things were running slower than I'd hoped over the weekend. I did go in to church yesterday late afternoon -evening and got the big ruffle on the underskirt...it was all ready to put on and it still took THREE HOURS to gather that puppy and get it sewn down. So I was planning to go in early today and work hard.

Younger DD caught me this morning. "Mom, I don't feel good." She has a stomach-ache and a low grade fever (I think...I haven't found where we put the thermometers after the move. She feels a little warm.) So much for spending the day at church. I may leave her by herself at home just long enough for me to run down and get the bodice patterns and the measurement book; mayhap I can get the patterns altered and the muslins made at home.

Of course, I do expect stay at church Very Late tonight. Maybe I'll grab a nap sometime today...

Sunday, December 04, 2005

Dem Bones

Finished putting the boning in my bodice last night; boy, is that stuff contrary! I used the pre-cased boning for it and tried to apply it with the curve of the boning following the body curves, but the stuff is twisting around inside the casing and rolling up. I guess it'll be held on tightly enough that the boning will be forced to conform to the curves underneath, but it is frustrating.

After I purchased this stuff, I read Kenneth King's article in a 10-year-old issue of Threads in which he recommends using Rigilene and 'stitching in the ditch' of the seams right through it. So I'm trying that for the Belle bodices...but perhaps I should suspend a weight from the ceiling using the currently rolled-up Rigilene to straighten it out a little? :p

Saturday, December 03, 2005

The 'Twice Turned' Gown

Had a bit of email discussion regarding Dickens' description of Mrs Cratchit's dress as 'twice turned'. My grandmother (1905-1986) talked about turning her dresses when she was young, but she meant that when the front got dirty she put the dress on backwards so it looked clean again. That's not what Mrs Cratchit did! What 'turning' the dress referred to was the frugal practice of reversing the fabric so that shiny, beginning to wear down places or stains were turned to the inside. Of course, this meant that the dress was 1)carefully, completely unsewn 2) possibly sponged, but at least pressed out well, and 3)hand sewn completely back together with the reverse side of the fabric out. Talk about an extreme makeover! As Shannon Gifford mentioned in an email about this practice, it does imply that Victorian ladies had access to fabric of a much higher, sturdier quality than what we'd find at our local chain stores, for sure. It also implies that the fabric used was not a print, as it had to have looked roughly the same on both sides.

But it does explain why she stuck the ribbons all over her dress; probably to hide the spots that motivated her to turn the dress the FIRST time. With that in mind, I probably should've stuck a couple of ribbons on her elbows...that would've been one of the first places to wear out. I don't suppose anyone in the audience will think of that, though... ;)

Quite a foreign concept to our throw-away society, isn't it? Although my backwards-dress wearing grandmother, who used to repeat, "Use it up, wear it out. If it doesn't do, do without," would heartily approve.

Friday, December 02, 2005

Brave in Ribbons


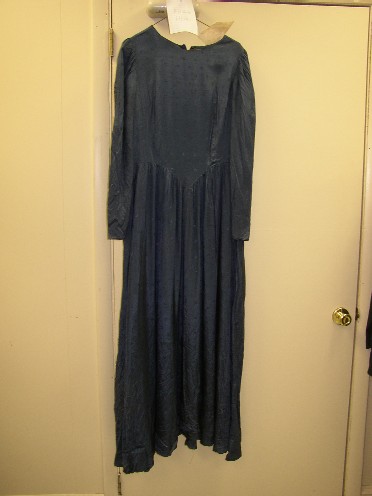
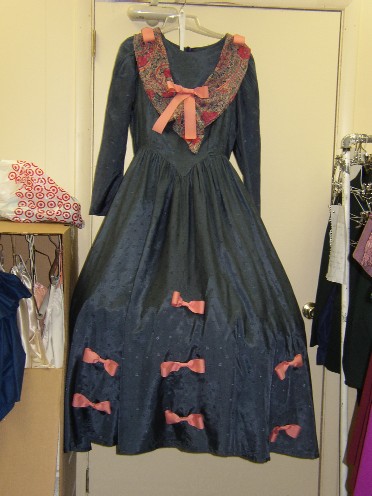
"Cratchit's wife [was] dressed out but poorly in a twice-turned gown, but brave in ribbons, which are cheap and make a goodly show for sixpence."

Here are the before and after shots of Caroline Cratchit's dress; it was originally in one of the boxes that came from Florida. The collar is actually printed stretch lace; I had it draped differently for about 2 weeks before I went in Wednesday and changed it all up. The actress bought a small hoop slip to wear...not period, but when she spent a chunk of her own money, what can be said? I don't think the hoop'll be all that noticeable...I hope ;).

I should finish up Grandma Cratchit's dress today; I'm going to try to make a pelerine to go on it, which should be a good trick as I've only seen one or two pictures on the web of such a piece. It'll be my best guess approximation.