Showing posts with label Makin' it work. Show all posts

Monday, November 13, 2023

Making Lemonade from Lemons: A non-sewing project...

 Two years ago I looked at my Christmas lights...cheap ones from Hobby Lobby...and realized there's way too much purple in them.  It kinda made the whole house look bluish/purple...we had snow on Jan 2 (following the high of 70 degrees then storms with tornado warnings on Jan 1), so I actually have a real, Christmas-looking picture here (This is RARE in Alabama...):


So last year I went in search of some nice red, white and green lights.  I found some that were recommended by a friend...pretty, tear-drop shaped lights.  Ordered 7 strings to begin the switchover processes; can't afford to buy all the lights at once, lol.   I put them on the bushes and left the Hobby Lobby lights on the railing.

But before we took those lights down, about 3 strings of those lights on the bushes had half the string dark.  And when we did take them down, a number of the pretty bulbs HAD WATER IN THEM. And, the teardrops were glass...pretty fragile glass...and a few were broken.  A few more broke because they tapped each other as we were moving the lights around. Yes, the lights were rated for indoor/ outdoor use.  Obviously, though, they weren't up to the elements.  We spent a day plugging and unplugging lights and managed to get all but two of the strings working again but I can't put them outside and, TBH, I'm not sure they will work if we plug them in this year.

So I began another search for red/green/white LED lights for the front of the house.  I have been looking since, oh, I dunno, July or August, for said lights.  And have found nothing.    Or at least, nothing I wanted; there were some that had, like, lime-green lights....nope.

With time running out, we went to Lowe's.  Where I bought two strings of white, two strings of red, and two strings of green LED lights with the intention of just switching the dadgum lights around and make my own red/white/green light strings.

So, instead of doing the Christmas sewing that needs doing on my day off (since Veteran's Day was Saturday) today...I switched lightbulbs in half the string sets.


That was way more complicated than it should have been.  Turns out each string has five light sockets/ bulb bases that are larger than the other 95, so I had to be careful to NOT put a regular bulb into one of the larger ones; it doesn't make contact and the string won't light.  I finally wised up and started marking the off-sized sockets and the bulb bases with a sharpie marker.  I have a LED light repair kit, which includes a 'bulb puller'... a skinny little rounded fork thing to pop off the lights.  It helped quite a lot, actually, but my fingers are still sore.  I'll probably do the rest of them later this week, but now that I'm onto the peculiarities it should go faster than it did today.

I'm even thinking about buying some white lights from Hobby Lobby, to match the multicolored lights, and just switching out the purple lightbulbs; I think that will help warm up the garland.  Might even be good enough that I won't have to switch the lightstrings on the garland.

Then I can decide what to do about the holly bushes in front of the porch...lol.

A PS....I went to add the labels and realized I had typed the whole post ON THE WRONG BLOG.  

Copied all the HTML and pasted it in here, then deleted the other one...

Yup.  It's Monday...

Saturday, September 16, 2023

Piece work

 I have spent most of the day hunched over the cutting table, thread tracing my lace, and then working on piecing the shoulders in.

My back is killing me at the moment.  So, by way of taking a bit of a break, I'll document the process, lol.

I had to fold the lace so the blue thread tracing would show up, lol.


After I thread traced the front and both backs, I rough cut everything out so I would have the scrap bits to use to fill in the shoulders.  

This is an interesting lace; the leaf motifs are only attached by about five threads; they are free floating otherwise.  I had to trim all the motifs from the underlap area of the added bit....and I will be trimming them out of all the seam allowances as well.


Matched up the motifs with the pieced area underneath.    I hand sewed the scrollwork...basically permanent basting, because after I hand sewed it, I ran it through the sewing machine, zigzaging over that stacked curvy line.


Then I trimmed up the under/ overlap.  The design is not quite consistent; some of the scrollwork didn't match up exactly.  But with the black underlay that is not going to show.


Then I laid the pattern back over the piece and finished thread tracing the shoulders.

I have done both the back pieces and the front is about half done.  It's about a 4" repeat...I BARELY had scraps big enough to fill in all four shoulder bits, because I had to match the peculiar slant of the motifs.

But 'barely'...is enough.  Whew.

I am saving all the little leaf things that I'm trimming off; if I need to sew a few on after it's assembled to fill in gaps where things had to be removed from the seam...I have PLENTY.

Saturday, August 06, 2022

In Which She Most Likely Ruined a Dress But Oh Well

 So, still not being able to lift anything heavier than a coffee cup, I decided to try a little project.

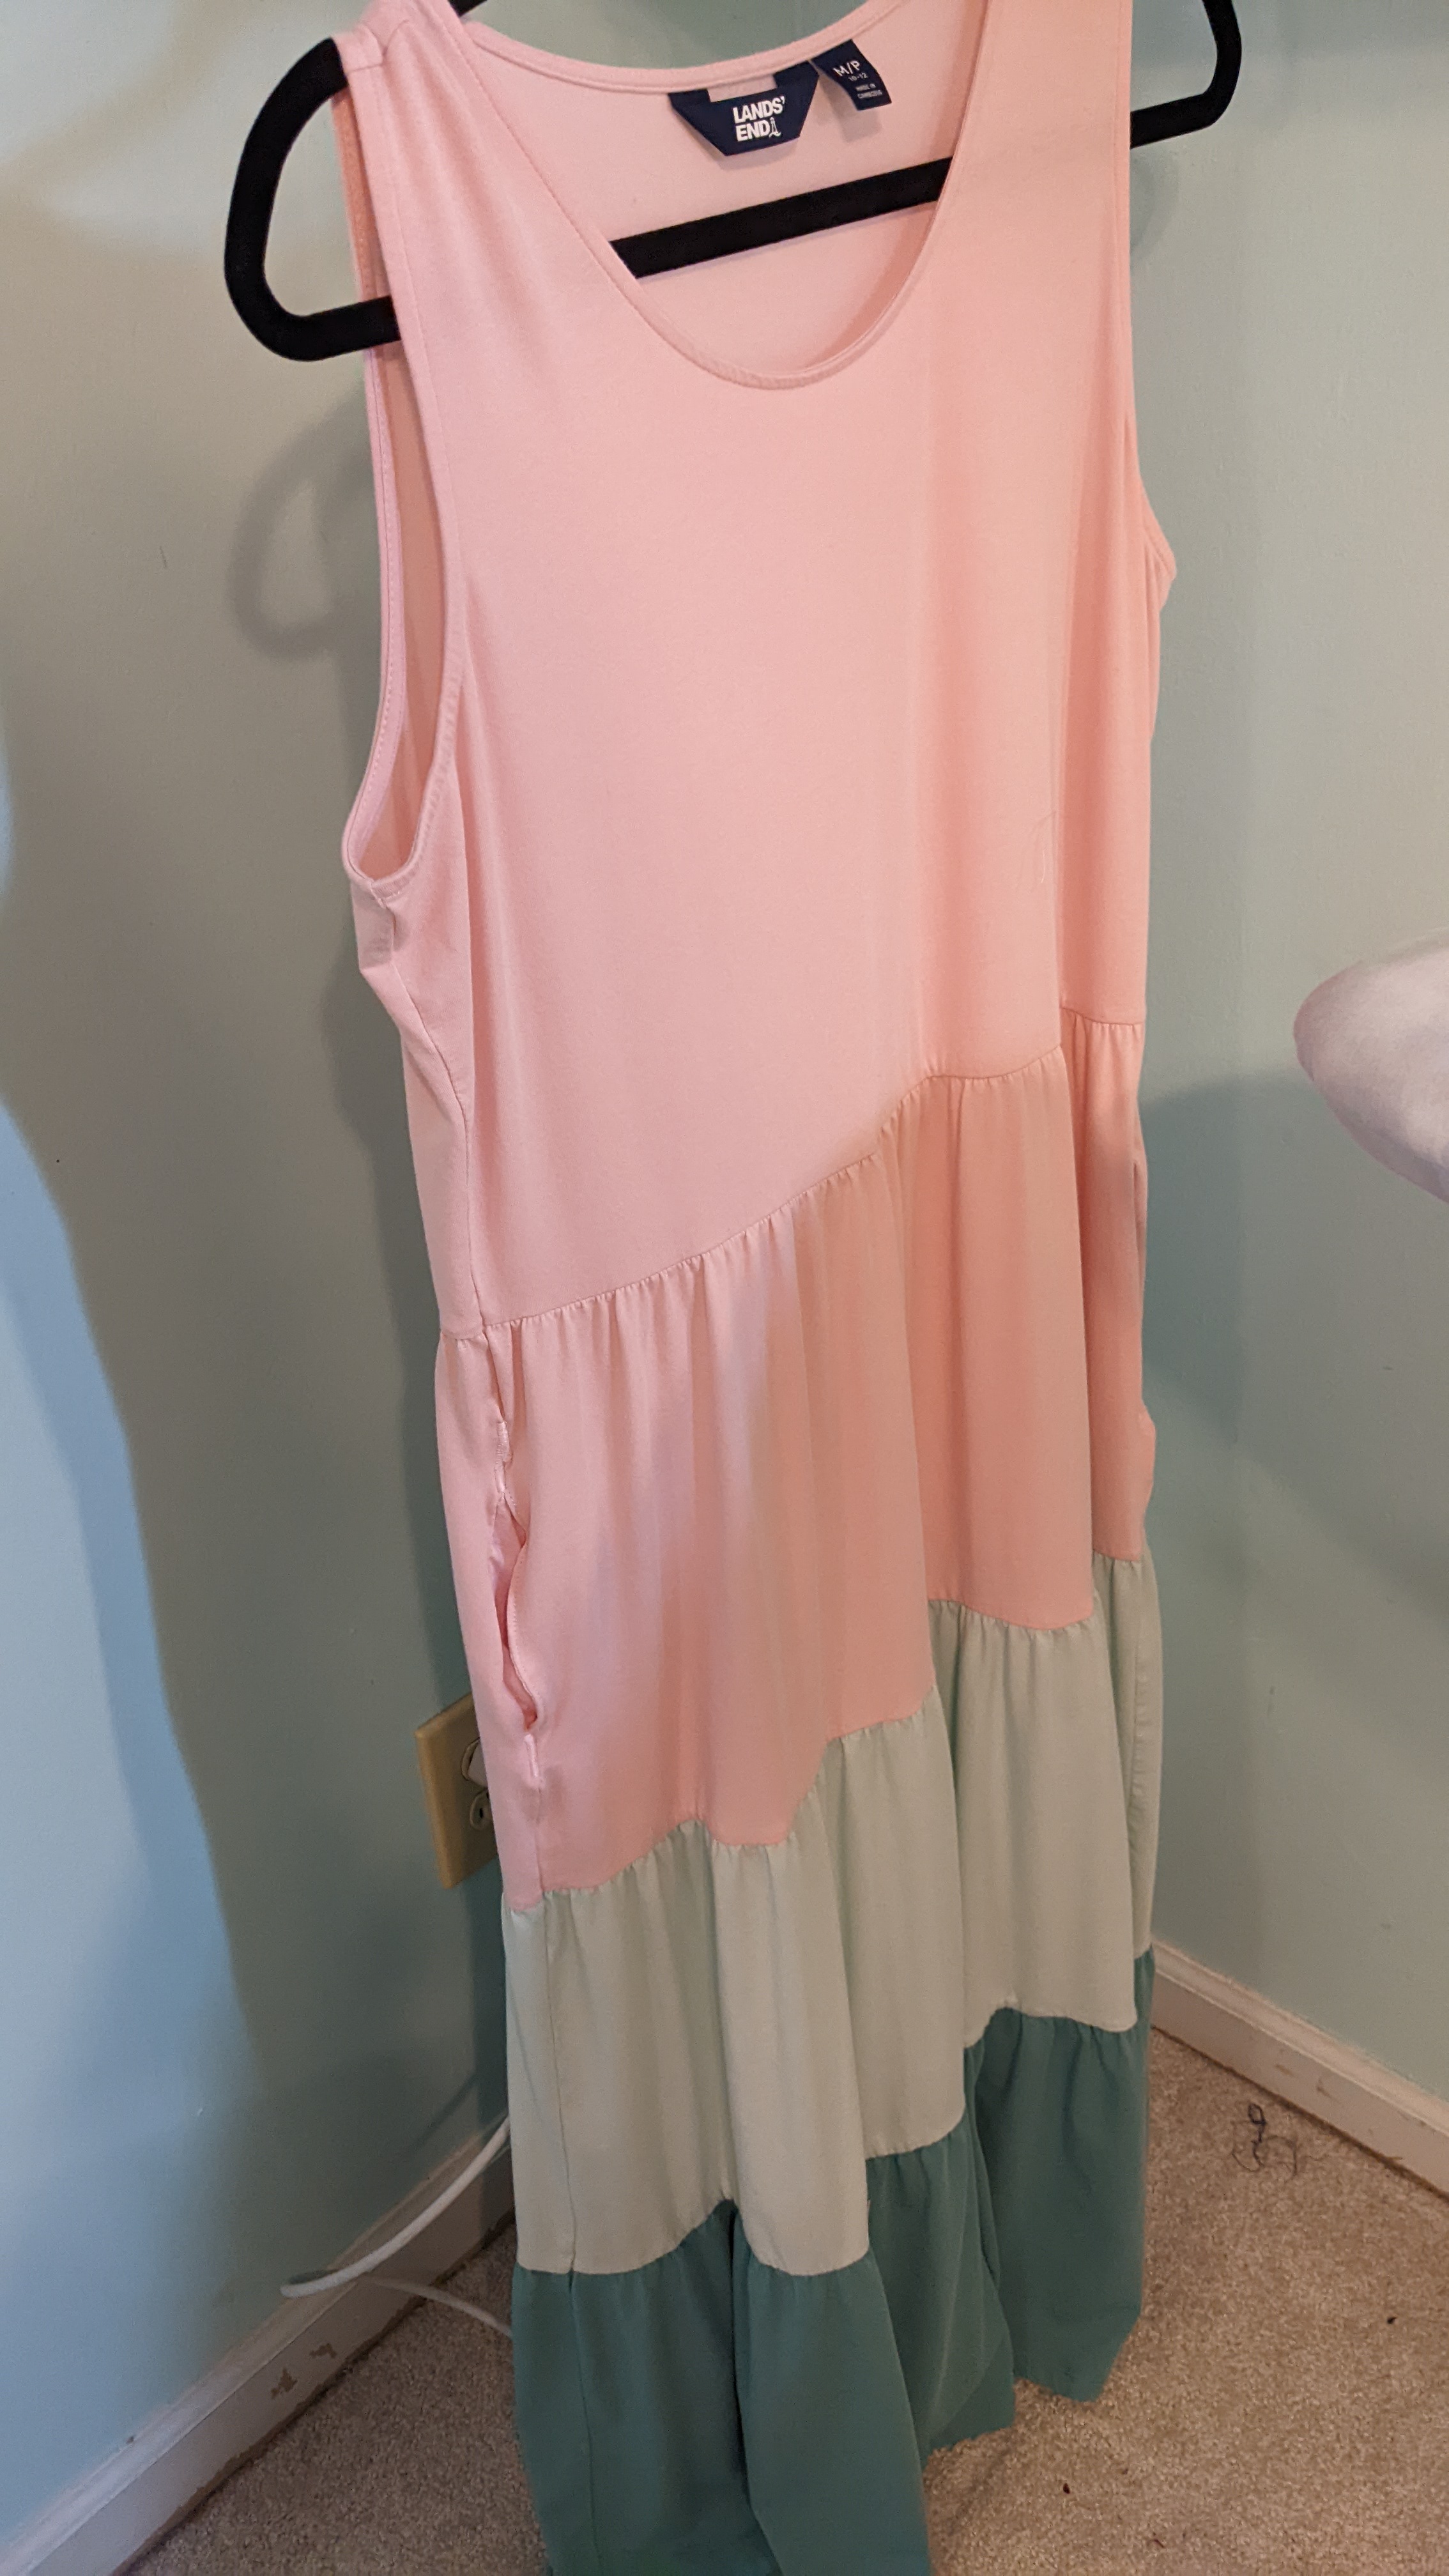
Earlier last month I bought a dress from Lands' End on a massive clearance markdown.

Pink and green.  I think I got it for less than the fabric would have cost.  But...alas, it has no pockets.

Which means it likely would just hang in the closet.

But I had some pink knit...what about putting in some pockets?

A quick little task, no?    I had the seams opened up really quickly.  Cut a generic on-seam pocket  from the knit and proceeded.

Unfortunately, 1) I couldn't interface the pocket because I'm still not handling an iron.  Knowing what I know, a RTW pocket likely wouldn't be interfaced anyway.  I did a quick look around for something suitable for a sew-in reinforcement but found nothing so I soldiered on.

And as I had so little seam allowance, I decided to modify my favorite pocket application and just curve the ends of the opening instead of doing a square turn.

Um, that might work but I didn't think it through enough and I ended up not leaving enough seam allowance on the pocket.

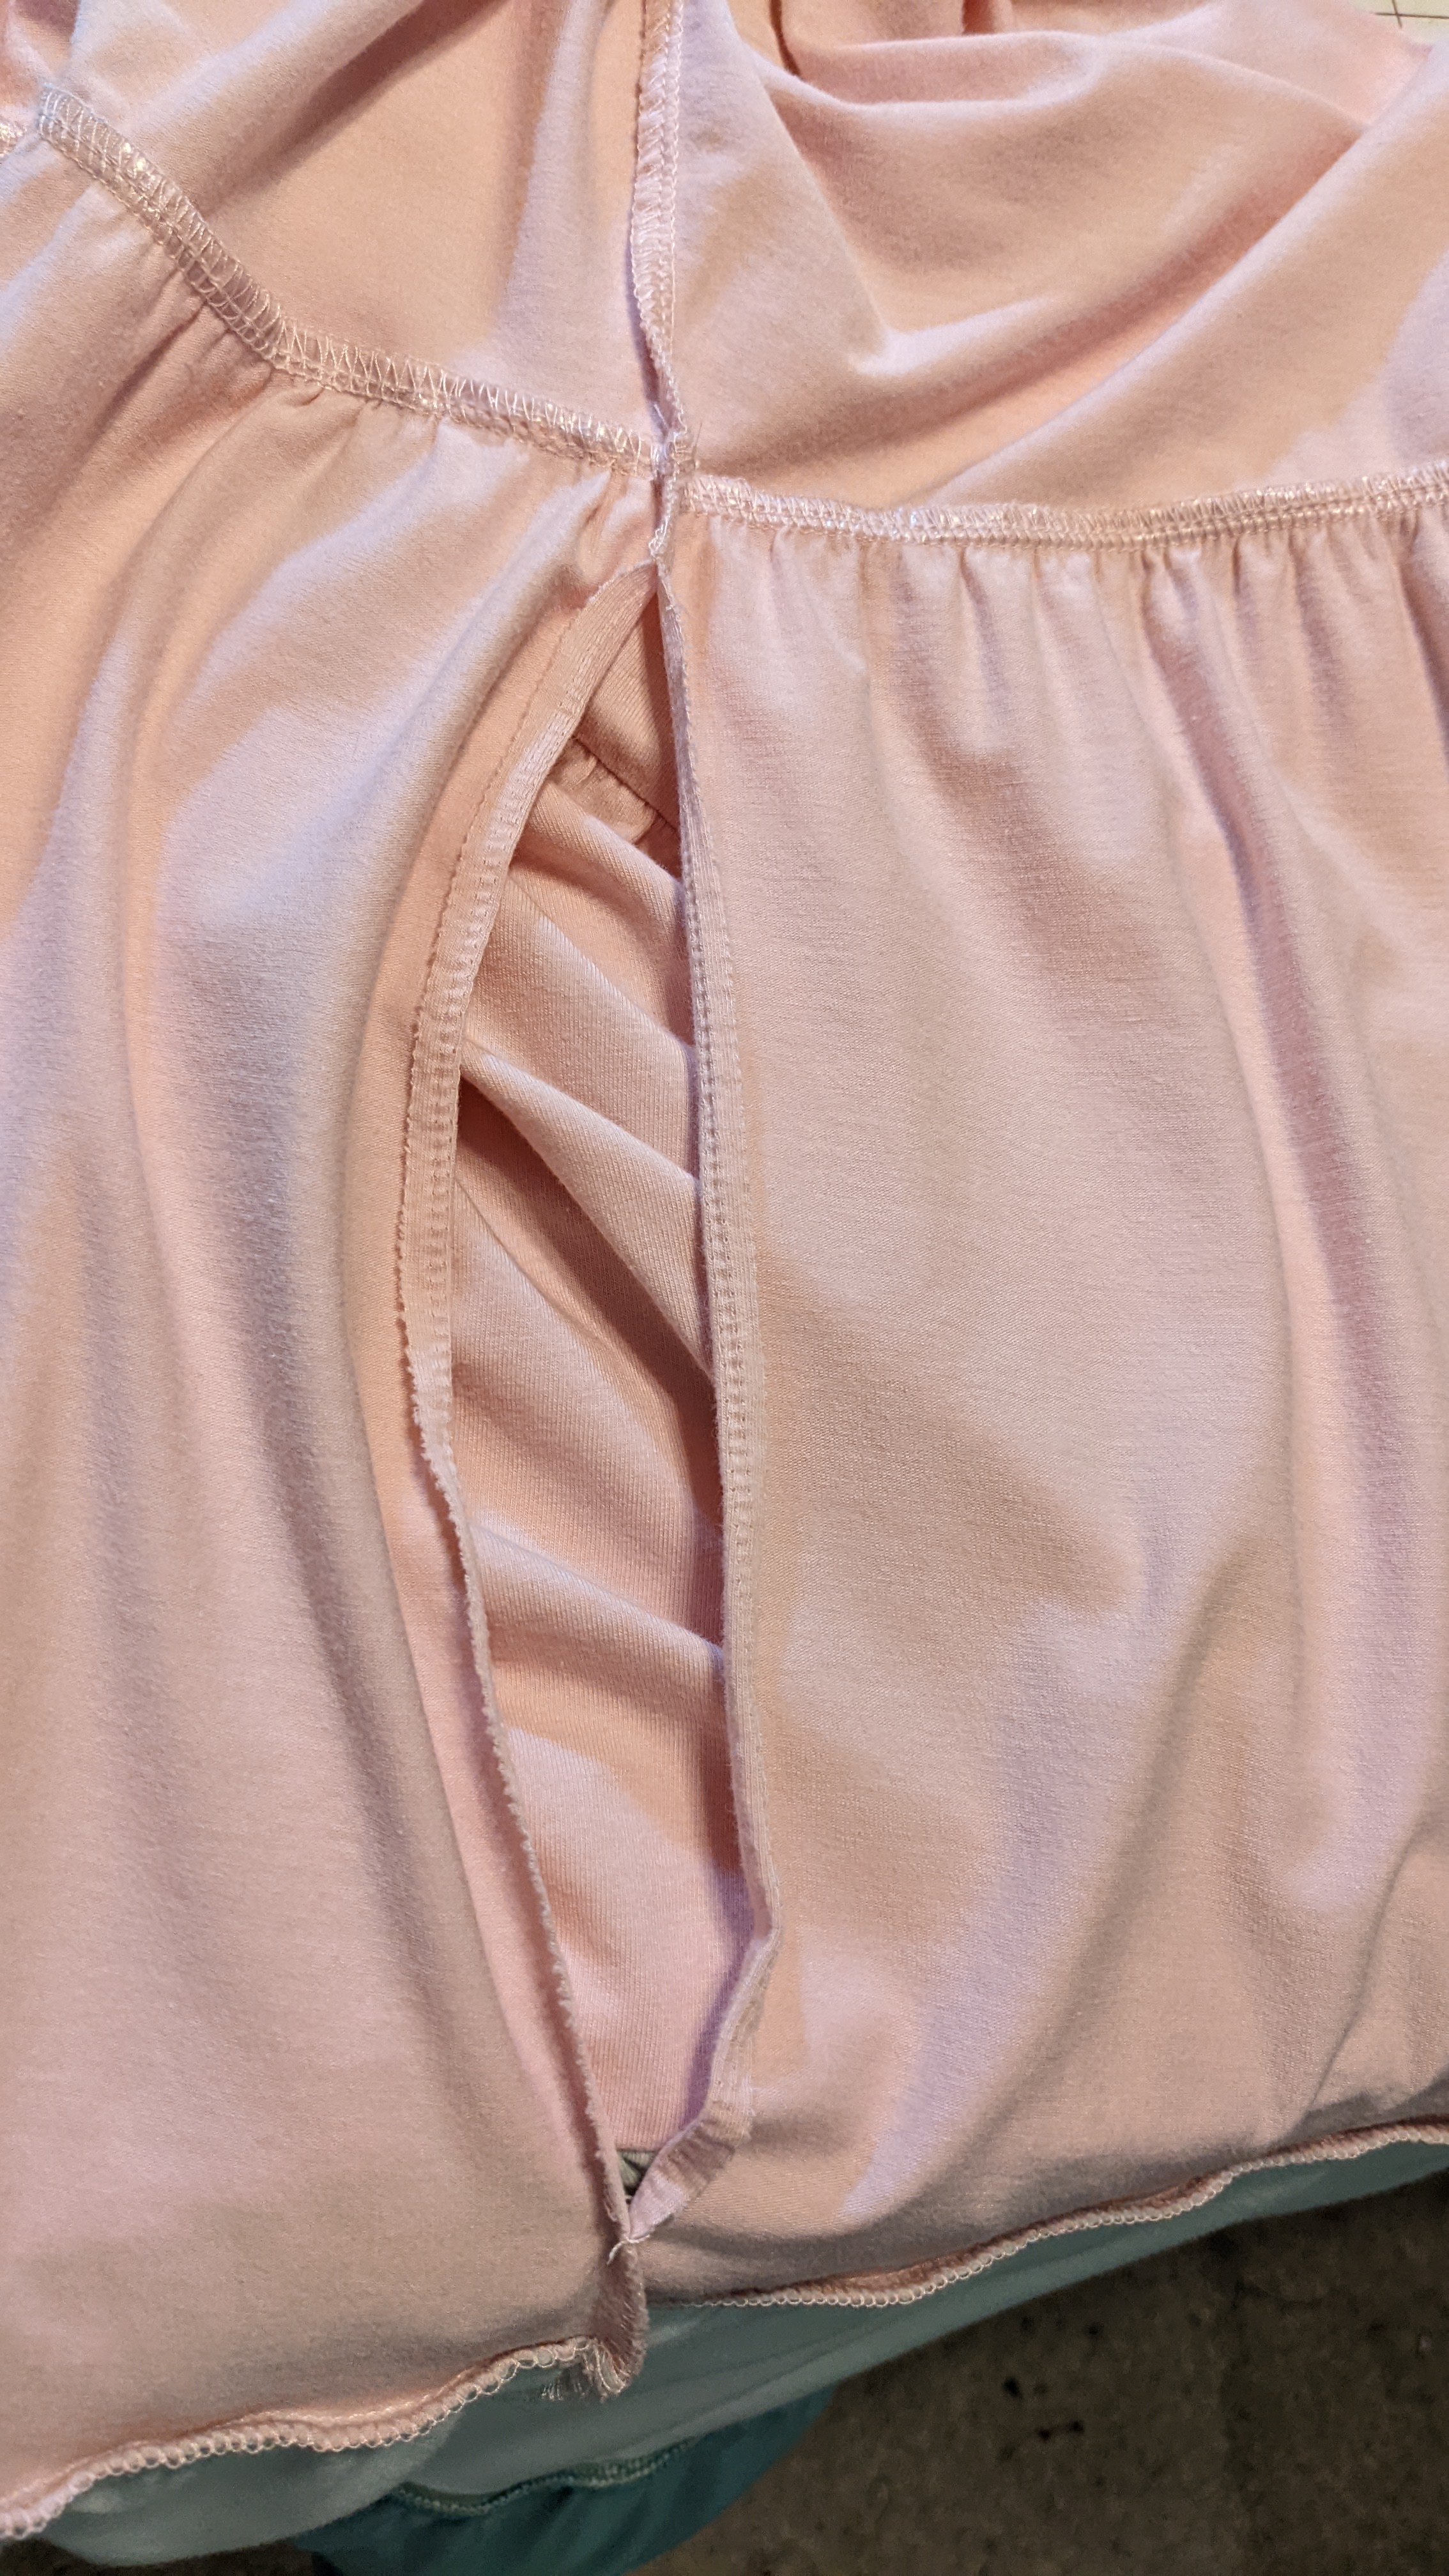
I did some ripping out and restitching but, well, there were a couple of, um, unstitchable areas (aka, holes in the fabric) when I was done.

No problem, I'll just do a little bar tacking to reinforce things.

Um again...somehow, the bartacking turned into a satin stitch on the seam on one side. Had no idea I  had sewn that far until I took it off the machine. It felt like it was hardly moving; I half expected a thread nest.  Nope...just some crazy stitching.

Yeah, it looks pretty bad on that side, but it was the one with the worst, um, weakness in the seam.  The other one looks like much more normal bar tacks.

That is the bad side. Just keep moving, right?

Actually, that is the first time I have ever attempted to add pockets to ready to wear.  I did too many on the fly alterations to my normal pocket construction process, but I did learn a bit.  # 1...don't clip anything until You Are Sure.  #2  Interfacing.  #3  don't forget the seam allowance, silly.  #4) There's a reason it's a corner and not a curve.

It may just get worn around the house...but it will get worn.  Which is more than would have happened had I not given pocket augmentation a try.


Tuesday, July 26, 2022

A little creative problem solving

 I was rather dismayed to find that if one has shoulder surgery, the sling/ immobilizing brace apparatus is applied while still in the OR, and is not to be removed before the first physical therapy visit.  

Which means it must be worn under the clothing for the first few days.

Those things are BULKY, y'all.

I did a few test runs, first under some of my really loose tops...fail...then under a couple of my hubby's t shirts...also fail.  I could stretch them over the brace but t was a chore and they were awkward.

So I picked up a three pack of men's 2X (I wanted 3X but they were sold out) t-shirts from Wally World to do a little hacking.

Found a chunk of cruddy black knit that I had made two tops from that turned my bras black when I wore them.  My idea was to put a godet on the right side so there would be enough room.  Wasn't sure how to go about it but I wasn't after making a snappy looking garment...I just wanted to be decently covered, lol.

So I cut one shirt up the side to about an inch and a half below the sleeve and measured the length of the cut and added an inch for a seam allowance and a hem, should I feel ambitious enough (and have time) to do one.

Then I measured that distance out from a lengthwise fold of my icky black jersey, measured along the fold the same distance +4", to allow for the vertical uptake of the brace, and connected those points with a shallow curve.  Cut two of 'em, because I had two black shirts and I was feeling brave.

So for the first go, I sewed the straight edge 1:1 to the slit in the shirt, then put it on over the brace.  It wasn't horrible, but the slit actually needed to go up into the sleeve...it was tight across the top part of the strapping for the brace... and I had a lovely (koff koff) drape on the side.  It would do...but I thought it could be better.  So for the second shirt I cut the slit up into the sleeve about 3", flipped the godet and sewed the curved edge to the shirt, gathering the excess at the middle top 1/4 or so of the curve.


Much better.  I hemmed that one and took it with me. The nurse who helped me get dressed after the procedure was impressed, lol.

But as it turned out, we caught the bone spur(s?) before any serious damage was done to tendons, etc., so there was no soft tissue repair needed and I don't have to wear the immobilization brace...just the industrial sling.  So there is plenty of room in these shirts, lol, and I should be good until therapy.  And maybe I will have the use of both hands much sooner than anticipated...

Saturday, July 16, 2022

Finished but no photos

 I finally finished the pink shirt last weekend but I don't have photos yet because...somehow it got a teeny smudge on one of the sleeves while in process.  It looks like ink or, you know, a greasy sewing machine lint spot...but the machines are brand spanking new so there hasn't been time for them to accumulate greasy lint yet, and I'm not aware of any ink pens anywhere around, so I've no idea what it is. The shirt has been through the laundry twice this week, hanging to dry in between so as not to set the spot, while I work on it.  It's very, very faint now and I don't know if I'm going to give it another go or not.  We'll see.

Anyway, once I decide it is indeed the last attempt to erase a tiny blip and iron it, I will take picutres.

Meantime, I will show you this bit:


Those are amputated cuffs, y'all. Once I got the first set of buttonholes on I realized that the cuffs were going to be uncomfortably snug.  I did a little research and found that somehow I had mistraced the pattern and they were about 1/2" too narrow.  Oy.  

Well, I had fortunately (as it turned out) completely forgotten to topstitch the cuffs (and the collar band as well), and I had a fair amount of leftover fabric so...I bit the bullet and cut new cuffs.  Took the old ones off and rearranged the pleating (I thought the excess sleeve width was because I had done a different placket finish) and then put the new ones on.  No mean trick because I did trim the seams out.  But once the new cuffs were on it was a MUCH better fit.

Then I put a bazillion buttonholes in it.  No kidding, I'm pretty sure I averaged doing each one of them  at LEAST twice.  It had been a while since I've made buttonholes and there were some finer points of it that got by me.  One or two were crooked.  The neckband one had lumpy seam allowances to negotiate (I think I did that one 4 times).  Once I lifted the presser foot...forgetting that that resets the template.  Oops.  Another time I mistook a piece of lint for the mark and put the buttonhole in 1" too low.  

Lots of frustration, lol.  But all character developing, right?  I know enough that a year from now I won't remember the frustration, I'll just be happy with my pink shirt.

It did feel like it took a long time...and it kinda did...but I had diapers to make (and they had issues as well, due to fabric quality...or rather, the lack thereof).  So all in all I have had a rather tiresome time in the sewing room and things have not progressed as well as I would have liked.

And I'm going to have shoulder surgery in a little over a week, so I don't know how long I'll be out of the sewing room due to that.  Hopefully all that has to be done is removing a smallish bone spur;  if we've caught it early enough I shouldn't have much muscle/ tendon damage that needs repairing.  Won't know for sure until the doc gets in and sees in real life what is there.

So, I may end up skipping some wardrobe additions for the scarf plan this year...  we'll just have to see...

Didn't plan on making a bunch of trips to Florida or losing the use of my dominant arm for a bit.  And I may need to use my one-week of sewing time left to make some button up shirts...

Monday, November 08, 2021

Looking at a make-do job...

 I'm sure there is someone out there who will look at this post and think I'm making fun of what someone did a couple of decades ago.

And that's not the point at all.

In the 'I'm doing small tasks in my spare time' category, I brought a pair of knickered-up pants home to replace the spent elastic.

Only as I got into it I realized I was looking at something else all together.

Now...let's say you're a mom in the early to mid 1990's and your youngster is in the church Christmas production.  Time is tight and you're handed a pair of pants and told to 'just cut the legs off below the knees and put some elastic in them.'

Only...you really don't sew.  And you don't own a sewing machine.  But all the moms have been asked to sew /altar up/ convert/ create their kids' costumes.

So whaddya do?

Well...you cut the legs off as best you can with the scissors you have.


 No sewing machine means you're going to have to hand sew it...even though you haven't done any handsewing since that cross-stitch thing you did in 7th grade home ec, er, family science...

And, you know, you don't have any elastic...how much would you get?  Maybe...you'll make do with what you have...


After all, it's just for a couple of performances, right?  Grab a couple of rubber bands and have at it.

I'm actually pretty much in awe of this mom's ingenuity.  And I know it can't have been easy to hand sew that casing around the rubber bands.

She had no way of knowing that 25ish years later someone in another church in another state would be taking her hard work apart to fit those breeches on another kid.

It did what it had to do at the time for hers.

Saturday, June 19, 2021

Another day of finger - crossing...

 So, last night I undertook to trace off the skirt bits of the dress pattern and attach them to the bodice pieces that I'd traced for fitting purposes.

And I discovered some thing...interesting.  I've seen articles over and over about skirt gores...that, for the prettiest drape, the grainline should run down the center of the gore.  Well, on this dress the grainline ran more or less parallel to one edge on each of the pieces.  The fullness wasn't balanced.  I thought about trying to correct it by just re-drawing the grainline, but that threw the grainline on the bodice pieces off so I decided to just let it go.  I wondered if there was some purpose to the skirt gores being drafted off center of the grainline, but frankly couldn't think of one.

Then I measured my fabric and discovered that it's 6" narrower than I thought, and I lost a fuzz over a quarter yard in length when I pre-washed it.  Given that it has a pronounced directional print that meant I had to cut everything oriented the same on the cross grain, I did a little trial laying-out on my cutting table mat and discovered that I was around 20" short of having enough fabric.

Gnashing of teeth ensued; I considered making another dress altogether; a sheath dress out of some pretty dogwood-floral-print cotton sateen but, when I pulled the fabric out, realized the black background wouldn't work.  I pulled my Loes Hinse City Dress...a stick straight pattern that should fit on the fabric I have...and then had a thought.  What if I just reduced the amount of flare on the gores?  AND...that would allow me to balance the flare on the grainline.

So, after another round of pattern alterations I did another layout and, if the math works...I have 3" to spare.  And then it was time to take a break and do the hand work on the altered bridesmaid's dress, so I can tackle cutting out my dress after I've had a bit of a sit-down.

I will be cutting that  puppy out single layer, to move every piece as close as possible together, and crossing my fingers, because. there's no going back if it's wrong...although I may end up piecing a bit if I have to.

I think I can...I think I can... I think I can...


Such a mess...

Thursday, June 17, 2021

We have a dress...

 Finally met up with the bridesmaid today and got the cobbled up dress on her...it's not a beautiful fit, but the zipper zips  without threat of malfunctioning so we're calling it good, lol.  All I have to do now is whip down the lining to the waistband and we are DONE....with that one.  That will likely be my busy hands task whilst I watch my kid the video streamer (yeah, that's what the Actor is up to these days) on Saturday.

Meantime, I'm working on my dress.  I finally decided to go with Butterick 6660 , a Connie Crawford pattern, as it looked floaty and swishy and wouldn't need much in the way of alterations.  The listed finished pattern measurements (you have to look on the actual pattern for those) put me in a Large, but I didn't want to charge into uncharted waters with my good fabric. So I pulled the last dress muslin I made out of a box and recut it into a muslin of the waist-up portion of the B 6660.  I knew from my measurements that I needed to drop the bust point a generous inch, so I did that on the tracing.  I wasn't fond of the sleeve on the picture;  it looked more fitted and kinda casual, so I found a sleeve with some funky pleating to try from a different Butterick pattern and traced the armsceye from that pattern onto this one.  I also rounded off the point of the V neck, raising that nearly 2".  But, in terms of alterations, that was it.

Made up the muslin to the sleeves...with a trick; I sewed up the back seam, where the zipper will go, and added a seam allowance to the front fold line and cut the front as two pieces so I could pin that up...which is a heckin' lot easier if you don't have a sewing buddy to close up the back for you.  Anyway,  I made up the sleeves first and decided I didn't like them much but thought I'd go ahead and see what they looked like. However, sewing up the sideseams showed that the front armsceye was a good half to three-quarters inch higher than the back armsceye at the side seam.  Plus the shoulders were way wider than my narrow frame.  I stopped there, went upstairs and unpicked everything, decided to go with a different sleeve...one I thought would be a looser sleeve than the one that came on 6660, and had an extremely frustrating time trying to figure out why, when everything lined up, the moment I pivoted the front and back armsceye to remove that excess in the shoulder the front ended up hiked up above the back again.  I finally decided to kind of average the top of that seam and take the change out of the sleeve ease.  I cut the new sleeves out of the old sleeves and sewed everything back up.

The shoulder was still too wide.  And the sleeves were not as generous and ease-y as I thought they were.  I pulled out the original B6660 sleeves and found that, despite the snug look on the envelope, they were actually going to be a looser fit than the ones I had substituted.  So I put all the other-pattern-sleeves up, whacked back the shoulder seam at the armsceye with the help of a french curve, then checked to make sure I still had some ease in the sleeve cap and called it good.

Tomorrow I'll trace the rest of the pattern and maybe even get my dress cut out.

Whilst I do laundry.

I may have one other dress to hem...if it comes in time.  We have a backup if it doesn't, but of course we want the actual dress that was ordered.

Dunno if I will get any housecleaning done before the out of town folks arrive, but hopefully we will all be dressed for the wedding...

Saturday, June 12, 2021

Crossing my fingers...


 So.  Here is one of the panels I  added to the side of the dress.  I only had to increase the bodice; the knit lining is stretchy enough that once I released the dart in the back it worked.  I clipped some of the gathering stitches in the chiffony overskirt to release some of the gathers and that worked.

That side panel is pieced up from the 3 1/2" I cut off the bottom, lol.  I did my best to cut it into on-grain rectangles, from both the lining/underskirt and the chiffony overskirt remnants, and then I pieced the rectangles to get the length I needed.  I used the satin from JoAnn's as the lining for it.  My pillowcase is still intact, lol.

At first, I just gathered the overlayer on the side panels and thought I was good, but when I compared it to the dress I realized it needed to be pleated.  So, off it came...and I had to cut a couple more pieces from the hem remnant because it needed more fabric.  I think I ended up with about  8 rectangles of the chiffon.  You *can* see the seams in it...if you look really close...but from any distance it looks like part of the pleating.

I haven't tacked the lining back down to the waist yet; I'm going to do one more try-on to make sure it fits.  I did add a pinch more width than the pinned-up ribbon indicated, because that would have been really tight and I don't want to strain the zipper.  If it looks too baggy it will be easy to take up a bit in the seams.

I will say it again...I am so glad this is not what I do for a living, lol.

Now...on to my dress....

Saturday, June 05, 2021

The hem is done...

 On the Bridesmaid's dress.  I had to pull out the backup machines because 1) my serger still is not cutting well and it was straight up chewing the poly knit lining.  The backup machine sliced through it like butter.  And, I discovered the back up machine makes a nicer rolled hem...I think that's just 20 years of improvement since I bought the first serger.  It actually rolls the edge of the fabric under and puts the stitching on a fold, instead of putting the stitching right on the edge of the fabric.  2) My 2014-purchased main machine does NOT have an adjustable-pressure for the foot, which meant the hem would get stretched and distorted.    The 28 year old machine allowed me to soften up the pressure foot, so the drag was greatly reduced.  

I'm still a klutz with a rolled edge foot, though.  The end product is ...passable.  But I think I probably sewed all of it at least twice and I have a pile of pulled-out thread from unstitching it when the rolled edged got wonky.

Then I took the rolled hem out of the chiffon bit that I cut off and unstitched the seams so that's available now for the filler panels.  The lining knit was not so cooperative.  I can NOT get the rolled edge on that unpicked.  I don't have much; the lining is not very flared, and I hate to cut off the rolled edge but I don't have a week to unpick it one stitch at a time.  If I can squeak the inserts out of that bit of excess, maybe I won't have to cut up a pillowcase, lol.

I drew a little schematic of the pieces I'll need to used on the sides; I will use those measurements to cut actual pattern pieces.  But I still have to unpick about 50% of the (lined) bodice from the skirt and open the side seams  so I can attach the insert panels, once I make them.  There are darts in the lining and gathering on the overskirt.  I can release/ redistribute the gathering so the overskirt will be fine, but  I don't think I can release the darts enough; I may have to put a godet in the top sideseam of the skirt lining to get it to match the expanded bodice.  We'll see.

Tomorrow's a full day so it'll be Monday before I can hit it again.  

I will be super relieved once this is finished.  I can't imagine doing formalwear alterations on a regular basis...

Sunday, June 23, 2019

I hate making muslins.

Really.  I don't like using fabric on something I'm going to throw away, ultimately, even if it's long-stashed fabric from the now-defunct dollar table at Wal-Mart.  That fabric could have been an nice shirt...someday, right?

I don't like taking the time to cut out a muslin, sew up a muslin, and pin up a  muslin to see if the alterations I made to the pattern are gonna work.

But do you know what I hate worse than muslins?

Wadders.  Garments that I had high hopes for but then didn't work.  Spending time on fabric that was NOT a dollar a yard, only to find that the garment doesn't fit/hang right.

So I'm making muslins of the whacked up McCalls shirtdress pattern.  I am dragging myself kicking and screaming, but I AM making a muslin.  I would be beyond stupid to just assume that all this pattern whacking is just miraculously going to work.  I mean, I took a bodacious front dart and rotated it into a princess seam.  Not a minor adjustment.

SO...I have the second muslin about half cut out; I need to get ON with it because I run out of June in a week....and this IS the June outfit.

Between what's left of tonight and then tomorrow after work, I'mma gonna be workin on the muslin.  Because I don't want a wadder. 

I recut the CF and CB from the original muslin, but the sides gotta start fresh....
And I want to make sure the pockets are in the right place.
And the combined collar is going to work.
And the sleeves are the right length.
Oy.

Friday, April 26, 2019

Another Project Due May 1....

Well, well, everything always happens at once, right?

Our church will host the Holocaust Memorial service this year in our auditorium, and the drama team has been asked, by the organizers of the event, to present a dramatization of Martin Niemöller's short poem, 'They Came for Me':

First they came for the Socialists, but I did not speak up, 
Because I was not a Socialist.
Then they came for the Trade Unionists, but I did not speak up,
Because I was not a Trade Unionist. 
Then they came for the Jews, but I did not speak up, 
Because I was not a Jew.
Then they came for me...and there was no one left 
To speak up for me.


So we have, on stage, a character representing Niemöller, and groups of folks who represent the socialists, the trade unionists and the Jews.  And the Bad Guys, who I am not going to name.

One of the young guys in the worship team has created an incredible audio/video piece w/ music, newsreel footage and photos, and a voice over w/ Niemöller's poem, quoted line-by-line, first in German and then in English.  We were going to go rather abstract, just using different colored t-shirts to indicate the different groups, but apparently the imagery on the video is so compelling that the leaders felt abstract costuming would detract from the narrative rather than enhance it. So it's a last-minute change of direction and we are scrambling for costuming. Other team members are scouring thrift shops at this moment to find suitable things.

So my job is to make the armbands for the, um, Bad Guys, with their well-known pinwheelish Symbol That Shall Not Be Named, and gold stars to pin on the Jewish characters.  The others will just be in somewhat period suggestive garments and identified by the voiceover.


I hit Hobby Lobby yesterday afternoon to get the bits of fabric in the right colors.  Including the Wonder Under for the applique, it was less than 10 bucks.  ( And I'm not running this through the yardage in/yardage out...not worth it...)

So I'm interrupting my dash to the finish for the SWAP and the 12-months-12-outfits challenges to do a little bit of fiddly sewing.

An update on the cropped pants...I wasn't happy with the way they looked.  They are still too loose in the leg to be what I envisioned, and I should have started the flare  about 3" higher than I did. I also didn't like the way the deep hem looked.  So I'm probably going to do a little hacking and re-sewing on those.  The black and white striped mariniere  top will take a couple of hours, start to finish, so I'm not really worried about it...much. 

But the Holocaust service is May 1st, and we have two rehearsals between now and then.

So, yeah, gonna be sewing. 

Tuesday, October 02, 2018

Mending is Better than Spending

So, The Flute Player's employment is with the onsite daycare the church runs for staff.  Her job is toy/playroom sanitation.  Not just for the daycare, actually, but for the rooms used by the pre-school ministry during Sunday and Wednesday services as well.

This means she spends a lot of time on her knees, cleaning and disinfecting various surfaces...tables, chairs, indoor play equipment, etc.

And, those of you who have read the blog for years will remember that, growing up, she was the WORST of my four kids for putting holes in the knees of her britches.

That has not changed.

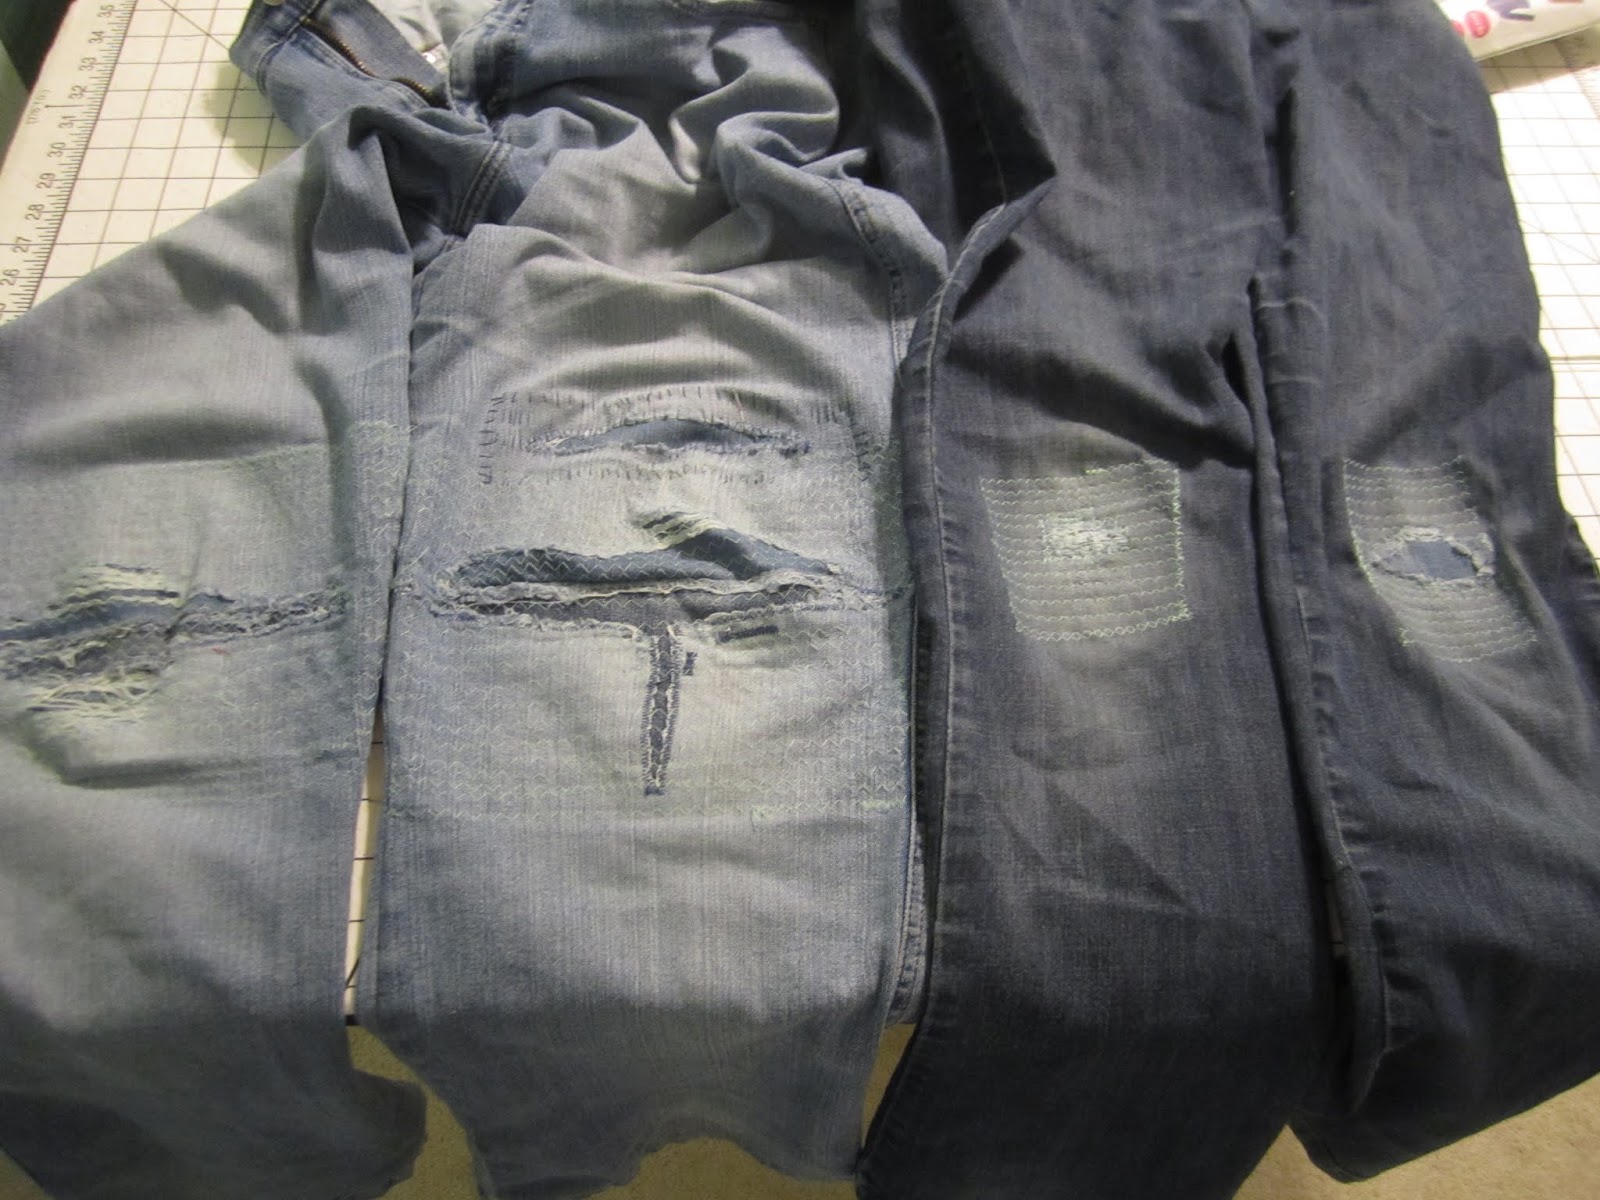
She had three pairs of pants she wore to work that were worn through.
One of them I have mended THREE times.

One I'm not sure is salvageable, due to the fact that the fabric has a high lycra content that appears to have pretty much disintegrated.  I've gotten the seams opened for mending, but I haven't actually tried to see if something sewn down would actually stay.

I finished off the third repair on the first set of jeans, and I managed to catch the third pair before it got to the flapping knees stage of the other two.  So two of the three holey pairs are at least wearable.

As mending jobs go, those are pretty ugly, but, hey, it's good enough for scrubbing toys.  Hopefully this will keep her from wearing her good jeans to work and putting holes in them...

How long do you suppose they'll hold up???? LOL.

In other news, I'm trying to make myself pick a pattern for the denim colored knits.  My first choice didn't work; wanted a cardigan out of the beefier of the two organic cottons but 1) it was cut slightly short of two yards and 2) I believe it shrank a bit when pre-washed and my first choice didn't quite fit.  So I think I'm going to trace off the shorter length of the McCall's cardigan that I've made two or three times already and go with that. 

I may have to make up a quick top first, though, to wear with my denim jacket Sunday.  So I have SOMETHING to put on, lol.

Monday, July 16, 2018

A little testing, a little sewing...

Well, a few months back I got some Brussels Washer Linen, in a nice light cross-woven gray, for some drapey, comfy summer pants.

I  knew, though, that I'd need a fairly loose style.  And I didn't think my TNT Oxford pants were quite drapey enough.

I thought about just altering that pattern, but, goodness gracious I've got something like 600 patterns stashed in an old Simplicity cabinet; SURELY there was something?

Well, I pulled out this OOP Simplicity pattern, copyright 1996:

 Y'all.  That's the year the Flute Player was born.

But that top could be in today's pattern books.  And the pull on pants...well,  it was a possibility.  Unlike 85% of the patterns in the cabinet, which were purchased when I was a much smaller me, this one had a wide enough range of sizes that I thought I could make it fit.

But I didn't trust it enough; didn't want to use my nice rayon/linen on an unproven pattern.  So I went rummaging through the 'bottom weight cottons' bin and found a 1.25 yard remnant and cut out the shorts.
I trimmed a pinch off of the front and added the wedge to the back as a compromise low-butt alteration that, surprisingly, worked.

Sorry for the flat photo.  I've no idea when I'll actually get to wear them.  Certainly not on a work day.

These are an otherwise unaltered Medium.  MEDIUM.  I didn't even use my cheater adjustment of using skinnier seam allowances; full 5/8" on these puppies, because of the inseam pockets.

I will say this:  were I  a skinnier me, there would be ENTIRELY too much fabric collected around the waist.  But, being post-menopausally absent a true waistline, these work just fine.

I can trace off the longer version (I'll probably just trace the legs and overlap the pattern, lol) and cut away.

And, you know, I may look for some drapey something woven to try that top.  Just for fun.

Tuesday, March 27, 2018

Arcadia Green: Attempt 2. Maybe.


So I had to do a little creative hunting to get the second dye batch.  Between Wednesday night last week and Saturday afternoon, Hobby Lobby completely shifted stuff around and the whole notions wall, including the shelf w/ the dyes, had moved.  I finally had to ask an employee...and it turned out she was working right in front of them.

And the aquamarine, of which an entire bottle is required in the mix for Arcadia Green, was out of stock.  Bummer. I bought some emerald green and a dusky blue, mostly because that's all they had, to see if I could approximate it.  I was plenty nervous about it, but didn't know what else to do.

But I had to pick up some milk, and, wouldn't you know, Publix had a decent selection of Rit dye.  Including Aquamarine.

So I mixed up another dye batch, intending to leave it in longer.  But this time I also put in a chunk of the 'too-gray' white cotton lycra knit.  One way or another, I was gonna get Arcadia Green.

I agitated it for 45 minutes instead of the prescribed 30, and when I pulled the fabric out of the dryer...the rayon/lycra was still too yellow, and I thought the cotton/lycra was too light.

But when I put the Pantone color swatch against it (the top one on the card)...it's about spot on.  Funny...the color on the choir facebook page looks darker.  And it's a dead match for the aqua post-it notepad.

Y'all, we wore this color three or four years ago and called it 'Lucite Green'.  Wore it two or three years before that and called it 'Seafoam'.  Sometime in the past, we just called it Mint Green.

So maybe I have  a couple of pieces somewhere that will do.  And I can make up a Jalie T from the cotton/lycra.  The Rayon...I'll put that back for another day.  Or another dye bath.  I honestly don't know if the yellowish cast to the original fabric is what is giving the yellowed results or if it's just not taking that dye due to fiber content.

BUT...wouldn't you know...yesterday I got slammed with a nasty sinus infection that sent me to the Dr this morning for antibiotics and had me napping under warm facial compresses all afternoon.  I may not have a singing voice this weekend anyway.  And I don't feel much like sewing.

Saturday, March 24, 2018

Arcadia Green Attempt One: Fail

According to a Google Search on Arcadia Green, it is Pantone 16-5533.

So I had a standard against which to check my dye results.

Which were abysmal.

Granted, the color rendering in the photo isn't spot on, it really is slightly less yellow, but still.  Not gonna work.

The gluey dots applied along the selvage for, I suppose, stabilization took the color just fine.  But the rest of the yardage...not so much.  It is *supposed* to be a rayon/lycra blend but now I'm wondering if that's quite accurate.

So, I will try again, and I will leave the fabric in the bath for a bit longer with less yellow in the mix.

And I'll throw in a second piece...if I can't get past mint green on the first one I should still get something useful.

But first I gotta make another run to Hobby Lobby for some more Aquamarine dye.

And maybe I'll check my bead stash to see if I have some Arcadia green beads so I can just make a chunky necklace.  If it weren't Easter Weekend, for which we have services spanning three days, I'd make do like I did this month (I will have worn the same top 3 out of 4 Sundays...)  But there's not a chance to do laundry between Saturday night and Sunday morning and the stage is HOT, so...

I'll try again this evening.

Thursday, March 22, 2018

A little weekend project...

So, the choir will be wearing something called 'Arcadia Green', along with black and gray, for April.

But Easter Weekend services start Friday night...with April colors.

And I have ONE thing in my wardrobe that is close to the right color...kind of a dark mint green to my eye.

I did peruse my usual suppliers but didn't find anything that really looked right.

Then I got a wild notion and did a search for Rit Dye Color charts...and found

Rit Dye formula for Arcadia Green: 
1 Bottle Aquamarine
1⁄4 Cup Teal
1 Tablespoon Lemon Yellow
3 Gallons water


So.  

Now, I have several pieces of white fabric that I have ordered online through the years.  Some are...thinner...than I had anticipated, so they will be undies, someday.

Others were kinda off on the color.  Too gray, too yellow...

Anyway, I pulled the 'too yellow' piece; I have about 2 1/2 yards or so.

It's gonna go in the dye bath tomorrow.

If it works...I might keep that little trick in mind for the too-gray piece next time an oddball color comes up.