Showing posts with label Refashion. Show all posts

Saturday, August 06, 2022

In Which She Most Likely Ruined a Dress But Oh Well

 So, still not being able to lift anything heavier than a coffee cup, I decided to try a little project.

Earlier last month I bought a dress from Lands' End on a massive clearance markdown.

Pink and green.  I think I got it for less than the fabric would have cost.  But...alas, it has no pockets.

Which means it likely would just hang in the closet.

But I had some pink knit...what about putting in some pockets?
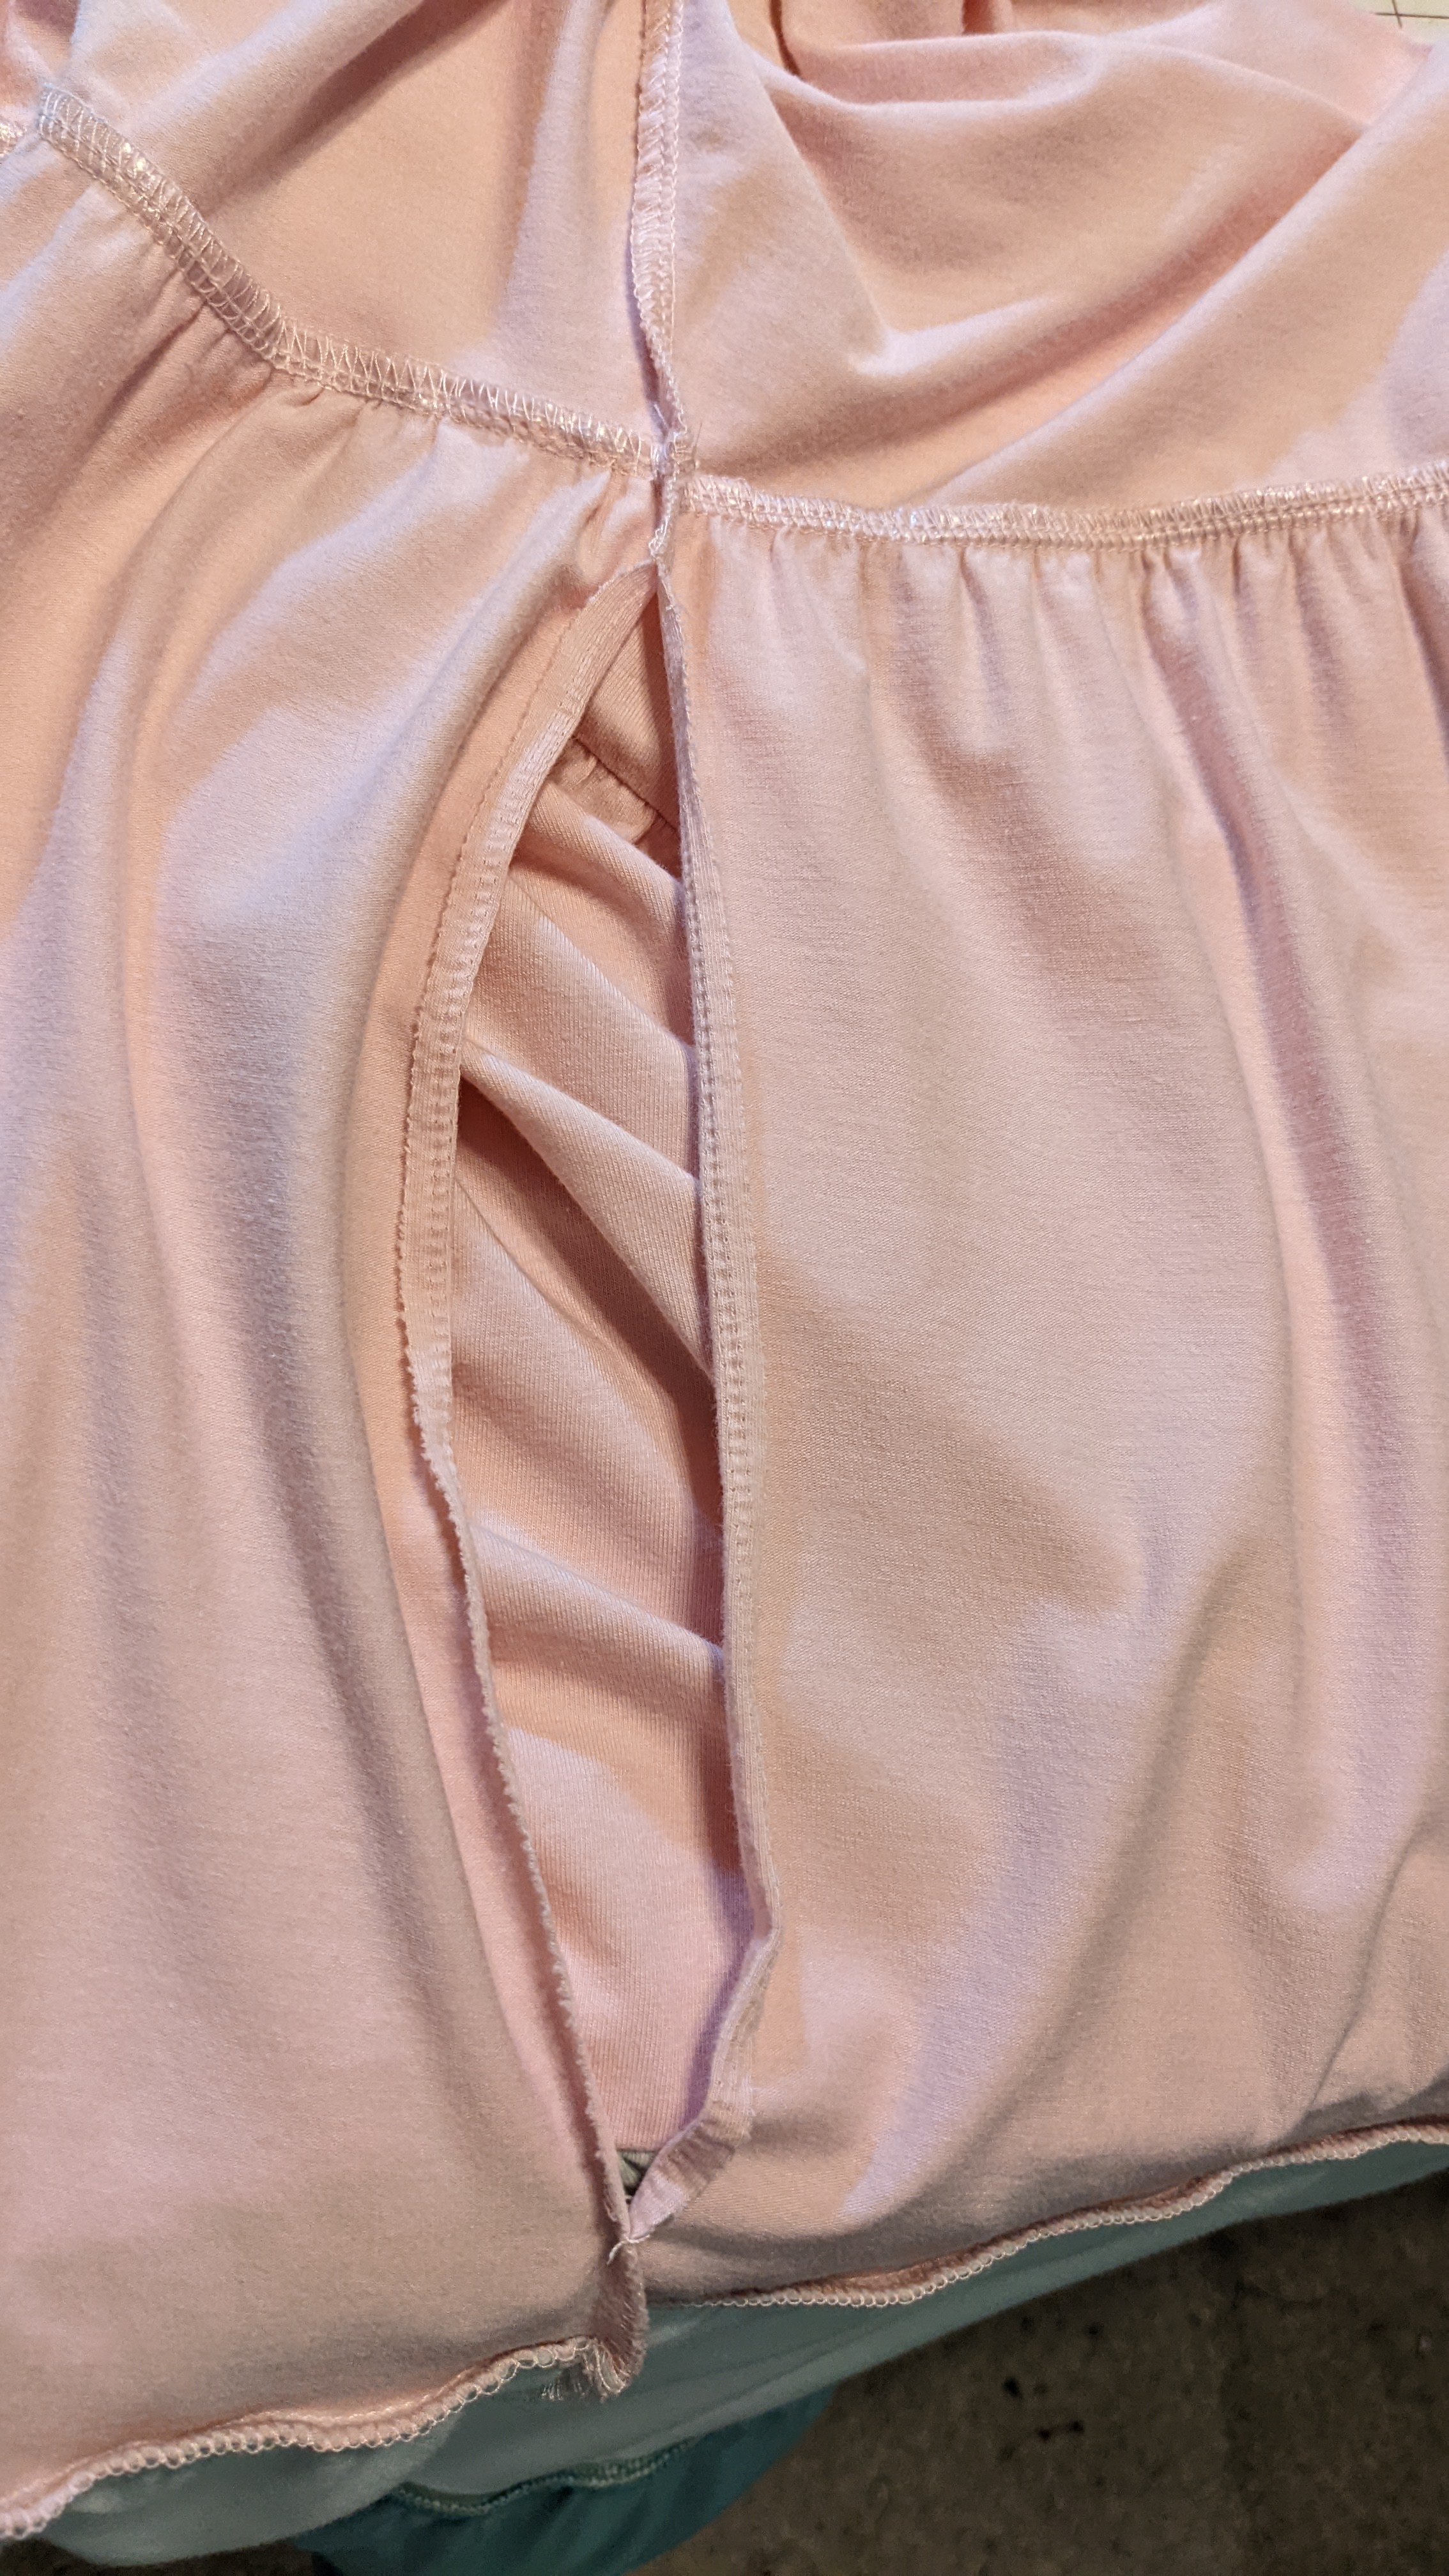
A quick little task, no?    I had the seams opened up really quickly.  Cut a generic on-seam pocket  from the knit and proceeded.

Unfortunately, 1) I couldn't interface the pocket because I'm still not handling an iron.  Knowing what I know, a RTW pocket likely wouldn't be interfaced anyway.  I did a quick look around for something suitable for a sew-in reinforcement but found nothing so I soldiered on.

And as I had so little seam allowance, I decided to modify my favorite pocket application and just curve the ends of the opening instead of doing a square turn.

Um, that might work but I didn't think it through enough and I ended up not leaving enough seam allowance on the pocket.

I did some ripping out and restitching but, well, there were a couple of, um, unstitchable areas (aka, holes in the fabric) when I was done.

No problem, I'll just do a little bar tacking to reinforce things.

Um again...somehow, the bartacking turned into a satin stitch on the seam on one side. Had no idea I  had sewn that far until I took it off the machine. It felt like it was hardly moving; I half expected a thread nest.  Nope...just some crazy stitching.

Yeah, it looks pretty bad on that side, but it was the one with the worst, um, weakness in the seam.  The other one looks like much more normal bar tacks.
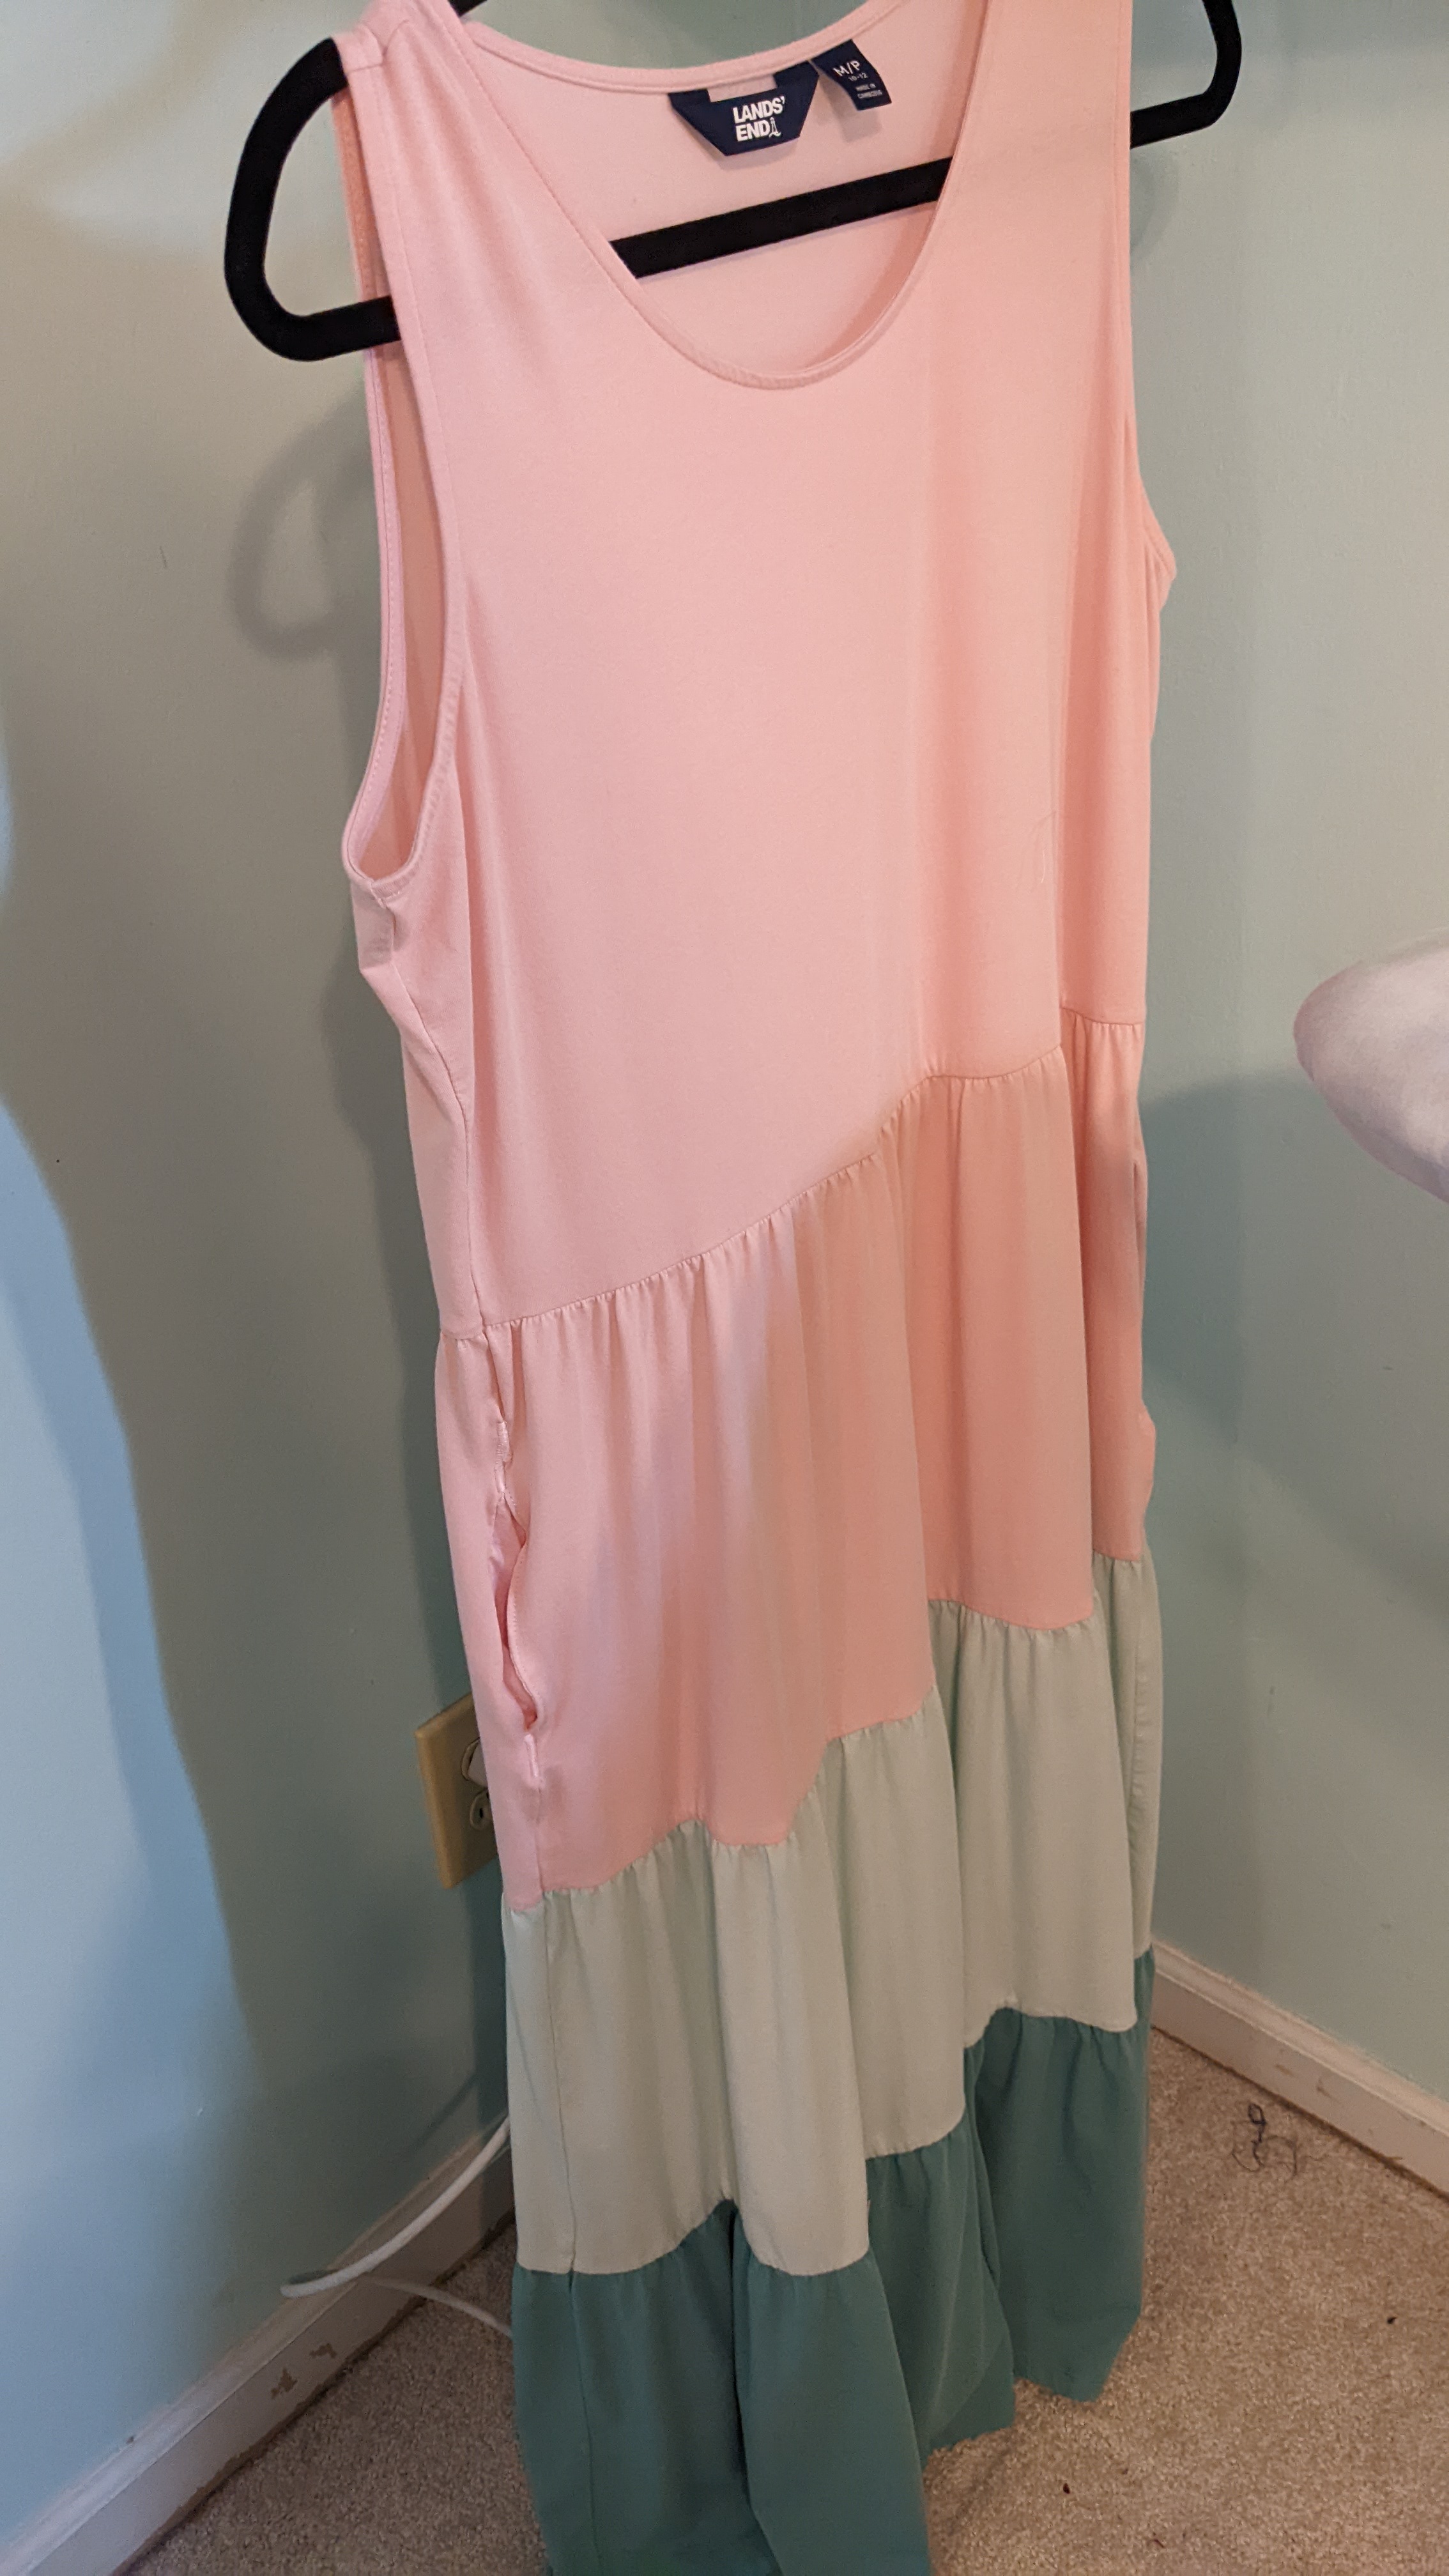
That is the bad side. Just keep moving, right?

Actually, that is the first time I have ever attempted to add pockets to ready to wear.  I did too many on the fly alterations to my normal pocket construction process, but I did learn a bit.  # 1...don't clip anything until You Are Sure.  #2  Interfacing.  #3  don't forget the seam allowance, silly.  #4) There's a reason it's a corner and not a curve.

It may just get worn around the house...but it will get worn.  Which is more than would have happened had I not given pocket augmentation a try.


Sunday, January 16, 2022

Finishing up the alteration of recent acquisitions....

 I had a few things that had arrived of late (some later than others, lol) that needed some altering so I decided to knock that out before I hit the new wardrobe sewing.

One was a pair of fleece-lined yoga pants from Land's End, for walking on chilly days.  They were about 2" too long; I tried wearing them cuffed up but the fabric fought folding so about 1/8 of a mile out I started walking on them and spent the rest of the walk hitching them up.  Annoying.  So I whacked off a bit and then hand basted them up before I double-needled 'em to hold that fold.  No pics...they're black pants so nothing would show up anyway.

And I had two more T shirts.  One I picked up during the family road trip to Indiana last summer; one of our favorite eating places is Das  Dutchman Essenhaus in Middlebury, Indiana.  If you go....go for breakfast, order off the menu, and get the beef biscuits and gravy.  SO GOOD.

Anyway, I wanted one of their 50th anniversary shirts but there wasn't a one to be had in my size.  But...hey, no problemo, I sew.  I got a 3XL.


 It's a little big, lol.  I took the picture last summer but didn't get around to getting the shirt apart for resizing until last week.  Cut it out last night and...doggone it if I didn't have the same 'too low   armsceye' issue with it that I had with the merino top.


Well, I knew how to fix it, lol.   I didn't have  enough cut off of the sleeve to fill in the gaps, so I cut the bottom to length and used that for a fill in.  Oddly enough, the front armsceye was considerably lower than the back armsceye...what's up with that?  But no one will notice it.


And I have my 50th anniversary commemorative t shirt...


Finally, I have a T shirt that I ordered online a couple of weeks ago...purely for whimsy...


Tron '82...Can you believe it's been 40 years since Kevin Flynn defeated the MCP?

Me neither. 

The ONLY size available was 3XL.  Fortunately, this shirt didn't need any gap filling on the underarm...I just took it apart, re cut it, and sewed it back up.  I left it the original length; I can wear leggings with it if I want.

If I dare, lol...Anyway,  I have a Tron shirt to wear to the Magic Kingdom on our long-planned whole family trip  in a few weeks; the Lord willin' and the Covid don't rise...


Moral of this story:   So what if the t shirt you love isn't available in your size?  If you can sew, you can make it work!


Wednesday, January 12, 2022

The Year's First Remake

 So, back before Christmas, I bought some socks from a bee-themed online sock maker; I like giving nice socks at Christmas (their merino wool socks will change your life, no joke there).  They've branched out into other garments as well, and I've been intrigued with the whole 'merino wool t shirt' thing I've seen.  So I thought I'd get one to see if the hype is true.  

The long-sleeved t I ordered wasn't 100% merino wool...it's blended with viscose...but it didn't cost $90 like some others, either, although I still thought it was a ridiculous amount of money for a t shirt.  But, given that merino jersey sells for about $30/yard, what you gonna do?

Well...when it got here and I put it on, I thought, maybe they'd better stick to socks....the fabric was nice and light and lofty, the color was good, the thumb holes are kewl, but...


Holy saggy bosomed batwtings, Batman, that looks awful.  Maybe I ordered a size too big?  My bust measurement put me right at the bottom of the XL range but I didn't want a snug fit, so that's what I got...

I think the armseyes are just cut Too Low.  It fits well at the hips.

But, you know, I really didn't want to mess with a return and I can't find fabric like that anywhere and I kinda specialize in recutting t shirts these days so... let's give it a go.

Unpick the seams, remove the sleeves, and open the sleeve seam to just above that coverstitched cuff that I did NOT want to remove.

Stack the sleeves, being very careful to keep right sides together:

Now, lay the selected t shirt pattern sleeve pattern over the cap, matching, as much as is possible,  the underarm seam lines.

 Whack off the excess sleeve cap.  This should take care of the extra long sleeves.

Now, fold the t-shirt body in half and, since I happened to grab the back first, lay the back over the fold, matching the fold line on the pattern and the intersection of the armsceye and shoulder seam.


Uh-oh.  The armsceye dips too low.  Um, what if I use the sleeve cap pieces I cut off to fill in the gap?

Let's cut the sides down, first.  

I morphed from the narrowest bit of the pattern out to the existing sideseam at the hem; I didn't want to narrow the hip area.  Just the top/shoulders.  Repeat for the front

Then, I cut the extra sleeve head bits in two and put one half on each underarm to fill in the gap and re-cut the armsceye.

I will not lie; I put a couple on backwards and had to redo them.  I don't have any intermediate pics, but here's the finished underarm, after adding the sleeve and closing the underarm seam:


Not dead perfect...it was not an exact process...but way better, doncha think?


Crazy to remake the thing, given what I paid for it, but I will wear this.

 ETA, looking at those pics...I think I ended up with the sleeves on the wrong sides, lol.  I was careful to put the back sleeve bit of the pattern against the back sleeve bit of the sleeves BUT...the fabric was wrong sides out.  I'm not sure, but I think I laid the pattern on right side up...which would have flipped the sleeves right to left. Wouldn't matter...except the thumb hole really is on the wrong side of the wrist, lol.  Doesn't hurt it; it just looks odd if you look close. But, you know, the original sleeve was twisted when I put my thumb through the holes, so...maybe it came that way and I didn't realize it.  Yeah, that's it. LOL.

I have a couple of more alteration projects in process to finish out before I dive into the scarf wardrobe sewing.  

Gives me a bit of time to ponder exactly what I'm going to do with that gorgeous but unstable cable sweater knit that arrived last week for the core wardrobe, lol.


Thursday, September 10, 2020

The Refashion Challenge: Results

 I think I'm happy.

Tuesday's post has all the pics of the original top and where it came from, but if you don't want to click through, here's what I started with (not sure if I mentioned it, but the tag said it was a 3XL):  

And, if you want the reveal before the 'what I did'...here's the shirt, remade:


You have to look to see the godets I added to the side from a gray-and-black stripe remnant that I 'd kept in the scrap box, but you can sure see the difference it makes in the drape of the shirt.  That stripe knit was a pricey one, actually, that I bought at one of the Sewing Expos I went to...I want to say it was Indianapolis in 2014, but that might not be right.  I'd made a t-shirt out of it, that has disappeared (no idea how a t shirt could disappear, but I haven't seen it in at least a couple of years).  I had a good bit left over, so I paired it up with an abstract print and used the stripe on the sleeves and neckband.  The print was royal blue, black white and gray and I loved the way the stripes played with the print.  But, over the years, the gray in the print changed from gray to a pinky-mauve color (I have another, entirely different print that did the same thing; now instead of grayscale it looks sepia).  The pink kinda clashed w/ the royal blue in the print and it definitely looked odd with the stripe in the sleeves and neckband; it was still in the closet but I just didn't wear it.

So, with that backstory in mind, we return to the weird oversized shirt.  I used my Vogue 9057 pattern for the base of the alterations.  After unstitching the sideseams and removing the sleeves,  I folded the shirt in half lengthwise.  I could only cut one side at a time because the hem-to-hem length was longer than my table, so I cut the front first, laying the pattern with the center front along the fold and the intersection between the neckline and the shoulder seam at the shoulder seam/ neckline of the shirt.   Where the waist shaping on the sideseam began to increase just below the waist, I laid my long ruler there to connect that line with the bottom edge of the shirt.  Whacked it down, then carefully moved the shirt so that I could cut the back the same way.  I cut something like 13" off of the shoulder seam, so it was enough to cut some cap sleeves from the scraps at the shoulder area...if I put the former shoulder seam down the center of the sleeves.

Then I carefully folded my little remnant of stripe and managed to get two godets that were 11" wide at the bottom and 15" tall.  I didn't do any scientific calculations...that was just the size I could get from the piece I had.

I did that after writing Tuesday's post, and then I pondered what to do. I thought it would just look like I stuck extra fabric in it if I didn't do something besides just the godets...and I remembered the 'rule of three' from my days costuming school shows. Basically, the rule of three is that if you use an element in an outfit/ garment, you should use it in three places so that it looks like a part of the garment.  But I was down to mere scraps of the knit...what could I do?

Then I remembered the top with the striped sleeves and neckband that didn't work anymore.  I hustled up to the closet and took the sleeves and the neckband off before I went to bed (really late, lol).  The faded remnants of the top went into the trash bin.  RIP.

I thought I'd just put the sleeves on the new top...they were from the same Vogue pattern.  But as I thought about what I could do while at work yesterday I realized that the long sleeves and the long godets would kind of compete.  Maybe it would be better to use the cap sleeves.  Maybe  there was enough scraps left to get a couple of strips to use as a band on the bottom of the sleeves...bonus, then I wouldn't have to hem the sleeves.  Hm.  And what about the neckband?   I didn't even know if the neckband that I pulled off of the faded shirt would fit or if I would need to add some length to it.

I came home, ate dinner, walked with my hubby, and then pondered what I could do and how I could do it.   I finally measured the bottom of the cap sleeves I'd cut, then measured the scraps and found that I could get two strips 1 1/2" wide long enough to go around the bottom of the sleeves, and I matched up the neckband to the neckline of the shirt and saw that I would only have to stretch the recycled neckband a little bit to make it work. And...bonus...it would pull that really wide neckline into a better size for me. The only caveat was that I realized I would have to hand sew the neckband on; I just layered it behind the original finished neckline of the top (it had a wrap-around binding).  Took a bit to sew it on, but now I have a double neckline that suits my narrow shoulders better than the original; not only did the stretched neckband pull it in slightly, but it extends about 3/8" beyond the original finished edge so it fills it in a bit.

From that point, it was just a matter of sewing it together and hemming the godets.  I actually finished last night and wore it today.

I am sad that I wasn't able to keep the pockets but they would have looked odd in the godet seam.  It's comfy and swishy and fun to wear.  And the button back is cool.

But...my serger is still not cutting as nicely as I would like. It's not horrible...but it's not clean as it should be, either.  We may have to make another trip west in the next couple of weeks.  Sigh.

Tuesday, September 08, 2020

A Refashion Challenge...

 At the end of last week, a large bag was circulated around the admin office at church.  Someone had unearthed a bag w/ some past conference merch T-shirts...all in 2 & 3 XL sizes.  There weren't many, and we were told we could have whatever struck our fancy.

I dug through the bag, whilst one of my co-workers shook her head, 'I don't think you're going to find anything in there...they're all Plus sizes'

'Oh, I'm not looking for a top that fits, ' I commented.  'I'm looking for raw material.'

She was shocked.  'You mean you're going to cut it up?'

HECK YEAH.

I found a shirt from 2016 that I had thought was kinda cute...but it was only in plus sizes back then, and it was kinda odd shaped.

I brought it home and took some pics...

 First, I tried it on, just to see what I had to work with.  And I will say, when I pulled it over my head, I thought, 'This shirt has been worn before'...slight remnants of a fragrance, and a bit of perspiration.  Then I realized what the shirts in the bag likely were...shirts that had been modeled in a photo shoot and then couldn't be sold.

 No matter.  I just ran it through the laundry after the pics, lol.

It's tunic length... just a hair longer than my shorts...and very wide in the shoulders and upper body, but almost snug through the thighs.  I suppose I could just roll with the oversized vibe but it would annoy the stew outta me.


You can see the shape laid out on the bed; it looks like it's straight, which is odd, considering how it fits like an inverted triangle.


The back is the part I liked the best.  It's a pleat, with buttons, so it looks like it buttons up the back.  

All the kids who are in town came by the house last night and we all sat around the front porch, socially distanced, and visited.  I put the time to good use and opened the side seams, removed the pockets and took off the sleeeves.  I have a couple of ideas of what I can do...we'll see what develops.

I am definitely keeping the back button detail, lol.

Thursday, May 07, 2020

A little hand sewing...

What little sewing time I have managed to find lately has been consumed with mask making...like many of my sewing buddies.  But I'm about to hit a wall and do some selfish sewing...if I can squeeze it in, lol.

But I did do a very small little project this evening...that needs a bit of backstory.

Oh, back before Christmas, I started seeing some social media advertising for a series about Jesus and his followers.  At first, I glanced at the still shots and thought it looked rather cheesy.  But a bit later someone mentioned that this series was done by the same folks who made a short video that came out a few Christmases back called 'The Shepherd'   I had watched it, and then rewatched it the next Christmas...it was well done and moving.  So I got curious.

I began watching the 'making of' videos...and found them to be really intriguing.  But when I watched The Miracle of 'The Miracle of the Fish' something shifted.  I saw the heart behind the the stories...and I ordered the DVD set.  Now, it is possible to watch them via the app for free, but I felt like if I were going to consume the product I needed some skin in the game, so to speak.

We watched the series during Holy Week, starting on Palm Sunday and finishing on Easter.

Those videos are Really Good.

I ordered a set of the DVD's for my mom for Mother's Day (she's already received them, so that's no spoiler...Happy Mother's Day., Mom, Love you)...and My Sweet Babboo, The Flute Player and I all ordered T shirts.  And we 'Paid it Forward' to help season 2.  That's how impressed we were.

Now, my hubby and my daughter ordered the logo shirts...the circle of fish around the title...but I had been struck by another design.  There is a scene in which Peter protests when Jesus calls Matthew...saying, 'This is different!'...and Jesus looks at Peter and replies, 'Get used to 'different'.'

That moment of dialog stuck with me...so I ordered the shirt that read 'Get used to different'.

But...when I got it...I realized that, without context, it could be taken for a comment on the current craziness....and that wasn't the idea behind it at all.There is a little printing on the left sleeve that reads 'The Chosen', but it's not very obvious.

I wanted some...context...for the statement.

My solution was to dig up some scrap knit bits and add the stylized fish from the series logo, handsewn in quasi-Alabama-Chanin-style, lol.

I'm pretty pleased with the result.

So...maybe that will help.

I mean, it's just a little embellishment on a T shirt, but, hey, it's something...lol.

Saturday, November 24, 2018

Bravery required....

The Alabama State Royal Ranger Leadership retreat was the last weekend in October; always a nice break to get away to the state AG conference center...which is a beautiful spot a couple hours south of us.
Every year, missionaries come in to share their ministry; this year, we had both home and foreign missions represented....including a young couple working in India.  One of the areas they are working in had a lot of women with very little opportunities, so they began a small business, employing the ladies to sew from home making Kantha quilts.  They taught the ladies how to sew the quilts and now these ladies actually have a marketable skill and can help their families.

They  had some small and medium blankets with them for sale, plus scarves and headwraps.

I got excited.  I'd seen so many GORGEOUS projects made from Kantha quilts.  It was quite a challenge to go through the pieces they'd brought to find something that I could use.  The largest blankets they  had with them were medium, which are about 40" wide and 6 feet long.  I could get a jacket front and back from one piece, but I needed another piece for the sleeves.  Finally I found a medium blanket and  a  small blanket with comparable pinks and close-enough greens.  The  larger piece is 5 saris thick (two outer ones plus three layered inside) while the smaller one is 3 saris thick (only one inner for batting).

They have a website, with quilts available, as well as a link to meet their artisans and learn their stories:

 ReMade India

The blankets have labels with the names of the ladies who made them.  Whatever I make, the labels are going to be part of the finished product.

First issue:  deciding on a pattern to use
Second issue: Placing the pattern on the quilts to best use the fabric design
Third issue:  Being brave enough to cut into it.

Not sure when this is going to happen...but I gave myself the challenge to finish it so I can wear it to next year's conference. ;-)

Tuesday, August 28, 2018

At the end of a busy month...

August 5 was the day that we celebrated the 'grand opening' of the new church auditorium...the gymnasium of the school that we bought...that had been gutted and rebuilt.  We had special services every Sunday this month in celebration.

From the back office/data entry position, it was like having a month of Easter.  Awesome, amazing weekends, but a lot of work.

Plus, we had a trip home for  my folks' 60th wedding anniversary, My Sweet Babboo's 45th year high school reunion, and the 104th annual Pippenger reunion.

Needless to say, no sewing happened. At least, no personal sewing.  A team of us did make something like 50 sashes to be embroidered to wrap on the chairs to reserve them for ushers/pastors/ leaders w/ duty, etc.  That happened right before we left town.  God bless the lady who did the embroidery.

I've barely kept laundry caught up.

So I'mma just gonna talk about some plans that I've got on percolate but haven't really gotten to.

I did cut out the gray Brussels Washer Linen pants.  They are sitting on the ironing board, right where I put them after I cut them out.  First step is to reinforce the crotch curve; I've heard that Brussels Washer linen tends to stretch out when worn.  I've got some fusible tape to put on it.

I should put it in the 2018 projects list...since this is like, the first thing I haven't just cut out and sewn up.

Plus, I happened to wander in to Charming Charlie (one of the few that hasn't closed) early in the month...or maybe it was late last month...wow, the selection has dropped considerably.  But I did find an interesting navy/white rayon/lycra jersey tunic that came home with me for probably less than I would have spent on the fabric.
It actually was a pretty close fit, but the shoulders are wide and the armholes low, as is usual for these things,  so I took the sleeves off and opened the side seams.  I need to raise the underarm somehow; I can't just recut it because the armsceye is about an inch below all my patterns.  So I may have some piecing.  And I want pockets in it somehow.  Thinking I'm going to do some color blocking with solid navy godets and pockets in the side.  Maybe.

I have an aunt (I would say elderly aunt as she's in her mid 80's, but elderly doesn't do her justice.  She hasn't slowed down a bit) who had some fabric she said she wouldn't use, so she gave me two garbage bags' worth while we were on the farm.

I glanced through it there but didn't really dig into it until I got home.  There were a couple of pieces that went straight into the donation bag...do you remember that 80's poly stretch terry that we all made athleisure stuff out of?  Yeah, that went in the bag, as well as some yellow poly linen look.  But the balance of it...maybe...
There are a couple of pieces that might make tote bags...or corn hole bags, lol...but there are some linings that I'll use to make pockets, some nice wool remnants that I'm going to have to use carefully, because there's not much, and one gorgeous bit of rayon challis that I'm guessing is from the late 80's...jade green, hot pink and royal blue paisely on black.  I had a whole capsule wardrobe based on those colors back in the day.  There's 3 yards.  Lots of options for that.  Oh, and there's also two yards of gold lame'...the same stuff I used to make all those Pippin shirts.  No idea what to do with it.  Can't imagine what Aunt Wilma got it for, unless it was some crafty thing. There's a bit of gold-and-white lace that may have been intended to go with it.

I haven't tallied this up for the stash; not sure what I'll do with it.

Because I haven't sewn,  part of my recreation has been filling up my shopping cart at online vendors, dreaming about it a bit...and then deleting it.

But one piece managed to actually make it through check out.

I've been looking for a rich red denim for a denim jacket for the longest time and when I found that Ann had some, well, I actually bought it (the photo is off; it's not nearly as orange-y as it looks).  It's already pre-washed and ready to sew.  Whenever I can manage to get to it.

Hopefully September will be a little more forgiving and I can get to the machine.  It is National Sewing Month, after all...


Saturday, September 23, 2017

More T Shirt Alterations...


I have pictures of the process for one shirt...but I haven't taken any 'finished' photos yet.  The second shirt...I only have a 'finished' photo, no 'in process'.  So maybe it averages out? LOL.

We saw the eclipse at Fall Creek Falls State Park in Tennessee last month and, of course, I had to get a T shirt.  And of course, I wanted a purple one...and they were nearly gone.  I got a 2XL, with the intention of cutting it down.

I used a boxy Kwik Sew T-Shirt pattern, and cut it down to size. I left the length; I'd like to be able to wear it w/ leggings so the extra length is a bonus.  I removed the sleeves, cut up the side seams, folded the shirt in half (still connected at the shoulders) and laid the pattern over it, overlapping the shoulder seams and just cutting straight down through the hem.  The sleeves are a little shorter; I put the peak of the sleeve cap on the peak of the (stacked) sleeves and let the pattern hang off below the hem.

Sewing was just a matter of putting on the sleeves, serging up the sides and tucking in the thread tales.  Haven't had an occasion to wear it yet...

For the Sisterhood shirt...well, it was one of the shirts that was in the product area for our recent women's conference.  Sort of.  When the shirts came in, there were a couple that had seams that had slipped when sewn and the fabric hadn't caught.  So I brought them home, unpicked the bit of seam and then serged it back up.  I bought one of them...so I had it early enough to wear it to the first night (one of the perks of being willing to fix things...).  But it looked like a nightgown, I thought, and the slits on the side were high enough that I had to wear a cami under it.

So, after the conference, I ordered some gray corded lace yardage, which arrived earlier this week, and played with it a bit.  I shortened the front 5" to get some hi-lo going on and hopefully making it look a little less nightgown-ish, then put the lace on to edge the bottom.  I zigzagged around the motifs and trimmed away about 1/2" of the t-shirt underneath around the curvy line of zig-zagging.

Good practice for when/if I decide to try some Alabama Chanin techniques...lol.

Then I put a bit of the lace on the strip that I'd trimmed away and zig-zagged it down, then put triangles at the top of the slit, to, um, cover them a bit.  That lace is laid right on the hemline and is not trimmed away.   I zigged-zagged along the edge of the hemmed slits, then again along the hem stitching line.

And discovered that it looked slightly askew when I put it on.  Took it off and compared and...one of the slits started about half an inch higher than the other one.  Silly me, not to have checked that.  But, as my mother would say, no one will see it on a galloping horse; you really have to look closely.  I'm just going to call it a quirk of the shirt (after all, I got it because it was defective anyway) and have fun wearing it.

An aside...I looked at it and thought it looked a bit familiar.  I pulled out my Sewing Workshop Eureka Top pattern and laid it over the Sisterhood shirt and...lo, and behold, it matched up perfectly, allowing for the fact that this is tunic-length and the Eureka is a high-hip crop top.  So now I have some ideas for the Eureka shirt...lol...


Tuesday, September 13, 2016

Transformation challenge...

Well, maybe a minor one.

This past weekend was our annual women's conference (no choir on Sunday...the stage wasn't reset and we didn't have risers...).  You know how it is at these events....there are goodies available w/ the conference logo or the Women's Ministry logo.  Ours is SHE....which stands for Seeking His Embrace.

I worked the registration area.  I mean, it was kinda my responsibility.  And we were wearing She-wear from past conferences.

Only I was short a t shirt.  I only had two SHE shirts for the three day conference.  So, I figured I needed to get another, so I'm good for next year.

Now, church staff had been allowed to shop the merch for an hour at lunchtime on Thursday, so we would have a chance at purchasing merchandise, since it always sells out.  And they had a tunic (or dress, for the younger set) that I fell in love with.  It was the Choir Red...you'll see it soon...and I got that; but I was saving it for Choir on Sunday.  Besides, EVERYONE was wearing the red dress over the weekend.  Er, everyone on staff was wearing it.  Turned out the other staff and pastors loved it as much as I did and the staff nearly bought it out.

But it was Friday night before I decided I wanted a shirt as well as the dress.  And baby, by Friday night the pickins was slim.  But Saturday morning, I had a brainwave.  And I went in and bought one of the few shirts they had left...in a size 1X.  The lady that worked the counter almost wouldn't give it to me. 'It will swallow you whole!' She protested 'It's huge!'

But I assured her that was what I wanted...'I'm going to cut it down.'

And...here's the t-shirt, before and after:


I had a bit of lace in my lace box that turned out to be JUST ENOUGH to finish off the bottom.  And, as an indication that this was Meant to Be, the lace was not only enough to cover the bottom but it was the right length for both the front and back to be balanced...no oddly off center motifs!  The jury's still out on the lace on the sleeves....I might trim the jersey out from under it, I might leave it as it is, and I might decided it's a little too much (as The Actor stated when he saw it) and take it off.

But I'm very pleased with the results.  Except for the size printing on the back that still says '1X - size 22-24'.  'Cause that ain't true now...lol...

ETA:  I realized that I forgot to post the pattern I used as the basis for the recut...it's Vogue 9057, my TNT relaxed fit T.  For the basics on how to cut down a T shirt using a pattern, click HERE

Monday, November 03, 2014

Chop Job The Second

Something was wonky with the light settings...and the cat hopped into every picture...but here's the second T I chopped.  I didn't take a 'before' picture of the XXL original, but here's what I had after cutting it apart and reshaping it.  It is the original length...if I get brave and trendy, maybe I'll wear it with leggings or skinny jeans... ;-)

Monday, August 25, 2014

Chop Job

I went to State  Girls Ministry Camp this year knowing it was the last time, as our church is  discontinuing our participation in that program.

I did not intend to get a t shirt; I have plenty of T shirts from years past, and I really couldn't wear them as promotional garments anymore.

But I liked this year's T shirt.  It was bright...it was sweet...

I finally decided I should get one.

But by that time they only had two adult sizes left...XL and XXL.

I hemmed and hawed, but finally decided to go ahead and get the XL...I could sleep in it or something, right?

I was unpacking my suitcase before I thought, D'uh!  Cut it down!

So I dug into the pattern cabinet and pulled out Kwik Sew 2900; a pattern I'd made ages and ages ago and kinda tossed back due to the boxy fit and batwing underarms.

But, for a promo T shirt...boxy and batwing fit the bill.  This was a rather beefy cotton jersey that didn't have a great deal of stretch, so a fitted girly T was out.

I traced off a Large...sigh, the last time was a Medium...and left it totally unaltered.

Then I hacked the t-shirt, cutting up the underarm seam in the sleeve and VERY CAREFULLY down the fold at the side of the shirt.

I left the neckline and shoulders intact, folded it in half  and matched up the front neckline and shoulder seams

 And then the back neckline and shoulder seams
 I cut the sleeves from the sleeve/shoulder of the original t; I was surprised that the original sleeve was not long enough to cut the sleeve cap.  So I left the armsceye sewed up and just cut the cap out of the shoulder area.  A bit of a weird detail on the shoulder now, to be sure, but it worked.

I folded up the hem allowance on the sleeve and put it right on the finished edge.
 So here's how it will all fit together...
 The sewing was really quick.  The only issue was that the shoulder of the t shirt was taped, so it's rather bulky right at the top of the sleeve cap, where the taped-and-seamed bit of the cap hits the remaining taped- and-seamed shoulder seam.

But..hey, it's still retained it's promo T look...and I'm no longer swimming in it. ;-)


ETA...a couple of years later...the lumpy shoulder really annoyed me; I eventually took the sleeves off and recut them again, this time putting the high point of the cap just under that old seam, and letting the extra pattern length just extend past the sleeve hem.  I put them back in and...much better! No more linebacker shoulders. ;-)